Changing a boat propeller sounds difficult, but it’s pretty straightforward with the proper instructions, so any boatsman should learn it. Whether you’re aiming to increase performance, replace a damaged propeller, or prepare for different water conditions, learning to change the boat prop efficiently is truly a worthy investment. In this guide, you explore boat propeller changing techniques while embracing ideas and tools for 2025 to ensure the process is straightforward and effective. We will cover everything you need to ensure good performance for your boat, starting with choosing the propeller and ending with its installation, so that you can keep your boat running efficiently.
Understanding Boat Propellers
Types of Boat Propellers
Boat propellers vary in type, and each type caters to a different purpose, thereby facilitating vessel performance in diverse conditions. The general categorizations are:
Fixed-Pitch Propellers
These are the all-time standard among many vessels, as they are rugged in construction and simple in design. The blades of this category of propellers are set at a fixed angle, allowing them to perform consistently regardless of the conditions and requiring practically no maintenance. This type is the best option for any general recreational or commercial use where uniform or steady thrust is generated along with low noise.
Controllable-Pitch Propellers (CPPs)
CPPs enable the adjustment of blade pitch while the propeller is in operation. They are employed in cases where a change in speed or maneuverability is required, such as in tugboats or ferries. They help save fuel and provide better control in varying water conditions.
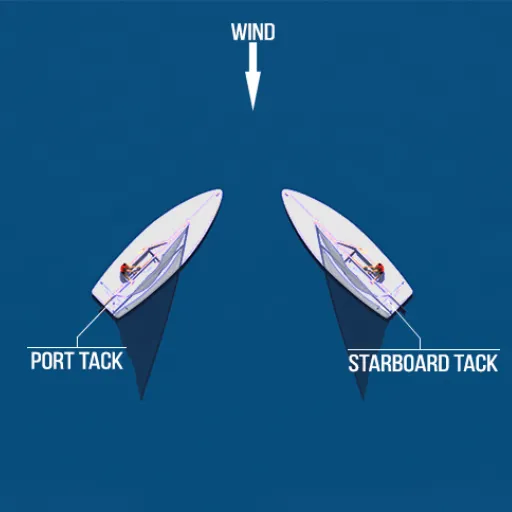
Folding and Feathering Propellers
Common in sailboats, the blades fold or feather to allow lower drag while the engine is not running. Folding propellers are typically used for sailing, while feathering ones are designed for efficient propulsion while driving.
Surface Piercing Propellers
A high-performance propeller used partially out of the water for speed. These types of propellers are popular with racing and high-performance boats as their design minimizes drag and maximizes thrust at high speeds.
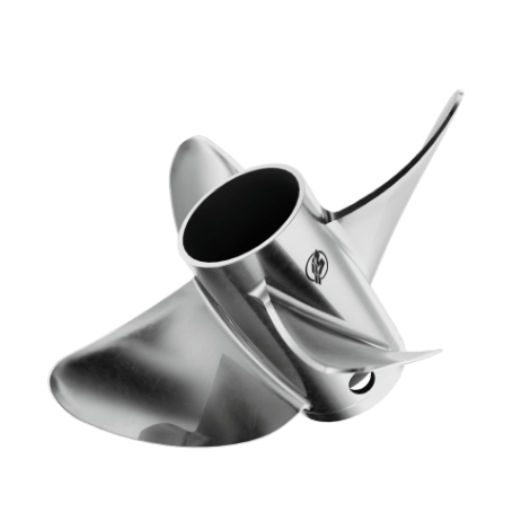
Duoprop and Counter-Rotating Propellers
A Duoprop is a system of two concentrically mounted propellers rotating in opposite directions, efficiently balancing the thrust and reducing cavitation. Such a system enhances acceleration, increases top speed, and provides precise handling, making it suitable for larger boats or high-performance applications.
Weedless Propellers
Designed to minimize tangling in areas clogged with weeds, these propellers feature specialized blade shapes that reduce obstruction. They are a perfect choice for fishing boats or vessels that ply the shallow or plant-filled waters.
Each propeller has its distinct advantages that tend to meet various needs. A selection should be made after considering the boat’s size, engine power, and intended use to achieve optimal performance and efficiency. The propeller to be installed on a boat should be one that enhances the craft’s handling, improves its fuel efficiency, and generally improves operational capability.
Advantages of Changing Your Propeller
Upgrading to a new propeller can drastically shape the boating experience in terms of performance, efficiency, and durability. A new-generation propeller, crafted with advanced materials and a new-age design, will raise a boat’s top speed and reduce fuel consumption, thereby putting money back in the bank. For instance, an effectively designed prop will reduce drag and improve acceleration, making it easier to navigate various aquatic environments. From another perspective, the upgrade will enable one to select a prop best suited to their specific boating activity, whether it be cruising, fishing, or towing. When a boater chooses the right propeller, it will significantly improve the boat’s operational efficiency and lay the groundwork for a smooth, comfortable ride.
2025 Trends in Propeller Technology
Expect new advancements in propeller technology drawing particular attention to performance, efficiency, and sustainability in 2025. In consideration of durability and fuel-efficient properties, manufacturers now pay special attention to materials possessing a high strength-to-weight ratio, with carbon fiber composites being at the top of the list. Simultaneously, changes in adaptive pitch technology are desired so that propellers can set blade angles according to performance requirements as speeds and conditions vary.
Key 2025 Innovations
- Advanced CFD simulations for optimized hydrodynamic designs
- Noise-reduction engineering to protect marine ecosystems
- Electric and hybrid propulsion system compatibility
- Modular designs for easier maintenance and repair
More sophisticated hydrodynamic designs are emerging, with CFD simulations playing a crucial role in the process. These allow for more accurate designs, minimizing drag and turbulence in the water. Noise-reduction engineering is another design consideration trending; its relevance lies in minimizing noise pollution underwater, which is detrimental to marine ecosystems.
Sustainability-wise, electric and hybrid propulsion systems are thus motivating alternative-energy-dependent design of propellers. These systems require the most efficient and lightweight propellers to preserve battery life and maximize distance. Furthermore, modular designs for propellers are undergoing upgrades, allowing for the maintenance and repair of parts without discarding the entire propeller, thereby creating less waste.
These trends represent a significant shift toward innovative solutions that are environmentally friendly and adaptable to the evolving needs of the boating industry, as well as addressing environmental concerns. By 2025, such advancements are expected to enhance the boating experience while fostering a sustainable future for marine technology.
Preparing for a Prop Change

Basic Mechanics to Change a Propeller
Changing a propeller might sound scary. With the right tools, though, it is a pretty straightforward job. Here is a list of the essentials for the successful completion of the work:
🔧 Propeller Wrench
It is usually a specialized prop wrench made of plastic or another material that won’t damage the nut itself, used to undo and tighten the prop nut with great caution to avoid over-tightening or stripping.
🧤 Gloves
Gloves are necessary to keep the hands safe from the cut edges of the propeller. They provide the best grip, especially when working in slippery conditions.
🛢️ Grease
The spline shaft should be coated with marine grease to protect it against corrosion and to facilitate future removal. This is a considerable factor when dealing with boats in a saltwater environment.
⚙️ Propeller Puller (optional)
Sometimes, propellers can be pretty stubborn to detach. A prop puller gives you the leverage to force the propeller off without breaking it.
🔩 Replacement Hardware
Have your propeller ready together with compatible washers, nuts, and cotter pins. These items must coincide with the specifications of your boat’s propulsion assembly.
🔧 Cotter Pin Pliers
These pliers help work with cotter pins when securing the propeller. They ensure the propeller is tightly and securely fitted.
Optional Tool Kit: A general-purpose tool kit consisting of adjustable wrenches, screwdrivers, and pliers may be helpful, especially when you encounter a hurdle during the process.
The availability of these tools becomes a deterrent to downtime and ensures a fast and efficient prop change. Ensuring that you do things properly will also guarantee the proper functioning and longevity of your boat’s propulsion assembly.
2025 Torque Wrench Recommendations
In 2025, when considering whether to buy a torque wrench, one must consider matters of accuracy and durability, along with other conveniences. The best brands continually innovate, developing new tools to cater to both the sporadic user and the seasoned professional. Below are some of the best choices for varying requirements:
Choosing the best torque wrench requires consideration of the torque range, build quality, and the specific needs of the usual projects being done. A good torque wrench ensures that work is done with precision and will serve one efficiently for a long time.
Safety Precautions Before Starting
⚠️ Important Safety Guidelines
Keeping the torque wrench in working order is very important. The torque wrench is inspected to check for visible damage, such as cracks or worn components, that could affect its accuracy and safety. Additionally, calibrations should be verified before applying the wrench to ensure accurate torque is applied. The calibration, after all, is reasonably well known to be important in maintaining a wrench’s accuracy over time. The next best thing is to wear your Personal Protective Equipment (PPE), such as safety goggles and gloves, for safety purposes. Also, consider the working environment: it should be bright, clutter-free, and hazard-free. By doing so, your safety is enhanced, and the accuracy and reliability of your work are also ensured.
Step-by-Step Guide to Changing a Boat Propeller
Getting The Old Propeller Off
🔧 Removal Process
- Secure the boat and ensure the engine is completely off and cooled down
- Remove the cotter pin using cotter pin pliers
- Use the propeller wrench to loosen and remove the prop nut
- Now gently slide the propeller off the shaft
Should the propeller be stuck due to the presence of debris or corrosion, spray some penetrating lubricant on the shaft and let it sit for a few minutes. Begin rocking it back and forth to free the propeller.
If it still refuses to budge, then — keeping in mind not to bend or damage the blades — banging the back of the blades with a rubber mallet may well do the trick. Once free from any obstruction, it is good practice to inspect the shaft and key for signs of rust, wear, or damage before installing a new propeller.
Installing the New Propeller
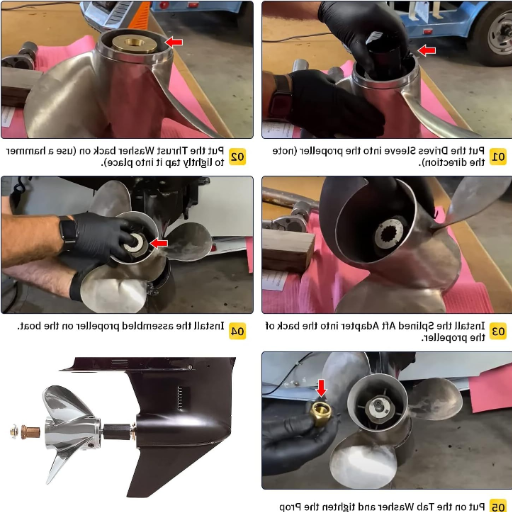
✅ Installation Steps
- Clean the shaft: Cleaning all dirt or moisture from the shaft will keep its surface smooth and clean. As a result, it will enable easier installation, improved performance, and increased efficiency from the propeller.
- Align the propeller: Align the propeller with the shaft, ensuring the key fits precisely in the slot of the propeller hub. Gently slide the propeller into the shaft so it sits perfectly flush and snug therein without being forced in.
- Install hardware: Installation of the washer and lock nut shall follow after the propeller has been put in place. Use a torque wrench to tighten the nut securely to the required torque recommended by the manufacturer, or to a standard value acceptable to him if none is specified.
- Secure with cotter pin: Finally, a cotter pin or locking device must be secured to the propeller nut, depending on the application. Check that the propeller rotates freely without undue friction or resistance.
💡 Pro Tip: Being correctly tightened, especially at the stated torque, prevents the lock nut from loosening during operation, while over-tightening would place undue stress on the threads.
Follow the steps methodically to ensure the new propeller works safely and efficiently, enhancing the equipment’s performance.
Testing the Installation
Once the propeller installation is complete, its proper functioning should be verified to ensure optimal performance and safety for all. Begin with a visual inspection, ensuring the assembly is correctly aligned and all components are securely fastened. Check the tightness of the nut and that the cotter pin or locking device is installed correctly.
🔍 Testing Checklist
- Rotate the propeller by hand – check for smooth, consistent movement
- Listen for abnormal friction, noise, or signs of imbalance
- Test under low-speed conditions in a controlled environment
- Observe for vibrations or irregular motions
- Gradually increase speed while monitoring performance
Next, rotate the propeller by hand and observe for any abnormal friction, noise, or imbalance. Its rotation should be smooth and consistent all around with no wobbling. With the equipment powered on under low-speed conditions, observe the operation in this controlled environment. Vibrations or irregular motions may suggest misalignment or installation errors. Eventually, as the speed ramps up, observe the performance to ensure consistency and smooth operation.
Evaluation should then follow under typical working conditions to confirm that the propeller performs exactly as intended, whether that is through propulsion, efficiency, or power output. Record those observations for future reference, and when necessary, review the manufacturer’s instructions or contact technical assistance to make any necessary adjustments. Thoroughly testing the installation will leave no doubt that your propeller installation is safe, efficient, and will best serve your equipment’s performance.
Propeller Maintenance Tips
Common Prop Repair Services
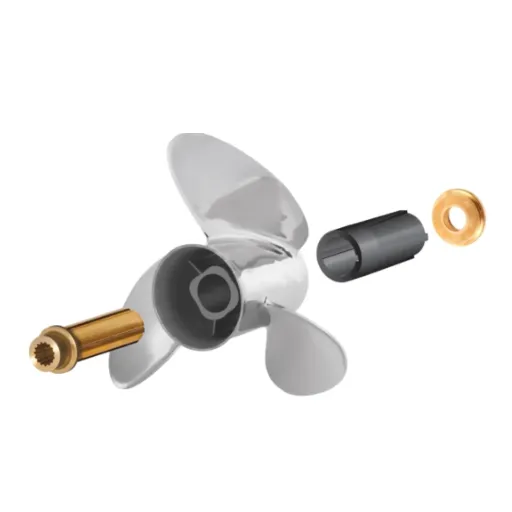
🔩 Hub Repair or Replacement
Worn or damaged hubs prevent a good transfer of power and cause slippage of the propeller. Inspect the hub for signs of wear, cracking, or deformation. If problems are detected, it may be necessary to re-press the hub or even replace it with a correctly matching model. Always check the manufacturer’s specifications when repairing hubs to ensure optimal performance and compatibility.
📐 Proper Alignment
When transferring power, ensure that the correct alignment is maintained between the propeller shaft and the blade structure. A misalignment can cause vibrations, noise, and inefficiency. Using alignment tools, carefully align the propeller. If the alignment differs significantly, professional services may be required to realign.
Service and repair of the propeller using these methods will help prolong its life while ensuring optimal performance and safety in operation. Regular inspection and prompt repairs prevent costly replacements and add to the overall reliability of the equipment.
Use Anti-Fouling Coatings to Protect the Environment
Anti-fouling coatings protect the marine environment and improve the working efficiency of vessels and equipment. They especially prevent marine growths of algae, barnacles, and mollusks on submerged surfaces such as ship hulls, underwater pipelines, and marine structures. By limiting biofouling, anti-fouling coatings reduce drag; thus, boats would burn fewer fuels, which are significant greenhouse gases —a step towards a sustainable marine industry.
🌱 Environmental Benefits
- Silicon and hydrogel-based release coatings provide ultra-smooth surfaces
- Minimal environmental impact with reduced harmful biocide release
- Reduced fuel consumption leads to lower greenhouse gas emissions
- Extended vessel service life reduces maintenance costs
Recent advancements in anti-fouling technologies have led to the development of environmentally friendly coatings that minimize or eliminate the release of harmful biocides into water, thereby ensuring optimal performance. Silicon and hydrogel-based release coatings primarily work by providing ultra-smooth surfaces that prevent organisms from adhering or growing, resulting in minimal environmental impact. Additionally, consistent use of anti-fouling coatings throughout the vessel’s whole service life may reduce other maintenance costs, thereby prolonging the operational service life of the vessel.
Careful application and upkeep provide the maximum benefits possible. Regular inspection and simple touch-ups will ensure that the protective layer remains intact through the working life of a vessel. In this manner, industries can effectively align operational efficiency with environmental responsibility, thereby satisfying current sustainability aspirations and regulations.
Gearbox Damage Prevention During Prop Changes
Gearbox damage during propeller changes is a common issue, leading to expensive repairs and operational shutdowns. Staying true to best practices and being careful in following them is vital for operators. As a foremost measure, during any maintenance, ensuring that the gearbox is fully supported and stabilized is of utmost importance. An unsecured mount or improper mounting can cause internal misalignments, affecting performance.
🛠️ Prevention Checklist
- Ensure gearbox is fully supported and stabilized during maintenance
- Check propeller hub and spline connections for wear or debris
- Apply correct type and amount of marine grease
- Follow manufacturer torque specifications exactly
- Test for abnormal vibrations, noises before and after installation
Checking the propeller hub and spline connections carefully for any sign of wear or dirt before installation is advisable for the technician. Even minute particles may cause an improper fit, thereby increasing the stress on the gearbox parts. Lubrication would also be a good preventive measure, where the correct type of grease is applied in the right amounts, thereby reducing friction and wear considerably.
Torque specifications must be faithfully followed during reattachment, as mechanical strain or slippage can occur due to either excessive or inadequate tightening. Just before and after installation, tests should be performed with great attention to detect any abnormal vibrations, noises, etc., that can be felt during prop rotation and prevent them from further deterioration. Through these precautionary measures, with a focus on attention to detail, operators can further reduce the risk of gear failure and maintain them in a high-performing state.
Common Mistakes to Avoid When Changing a Prop
Incorrect Alignment and Its Consequences
In my experience, one of the most common yet significant mistakes affected by improper alignment during propeller installation is this. Getting the alignment right is necessary to ensure the smooth working of the propulsion plant. With the propeller misaligned, uneven stresses will be placed on the gearbox, causing it to wear out quickly. This shortens the life of critical components and degrades performance to the point where vibrations and noise are now problems. The misalignment, though slight, almost sets in motion a ripple effect over time, potentially leading to significant expenditures in repair or replacement.
⚠️ Consequences of Misalignment
- Increased energy losses and higher fuel consumption
- Extreme mechanical stresses on gearbox components
- Higher likelihood of sudden failures compromising safety
- Expensive repair and replacement costs over time
Apart from this, misalignment can also cause energy losses and a higher rate of fuel consumption, as the system works harder to counterbalance the imbalance created by the misaligned propeller. This, in turn, can cause extremely high mechanical stresses and an increase in the likelihood of sudden failures that could jeopardize safety in critical applications. Therefore, checks for alignment should be performed during both installation and maintenance to eliminate the risk. To ensure that there is no guessing involved, use precision tools such as dial indicators or laser alignment devices.
At last, I have learned always to cross-check any alignment with manufacturer specifications. This keeps performance and durability intact. The cost of all those misalignments could balloon out of control in terms of time and money, but with a proactive approach like double-checking the alignment and keeping the entire process documented and accountable, operators can maintain reliability and smooth operation in the long term.
Material Choice for Your Prop
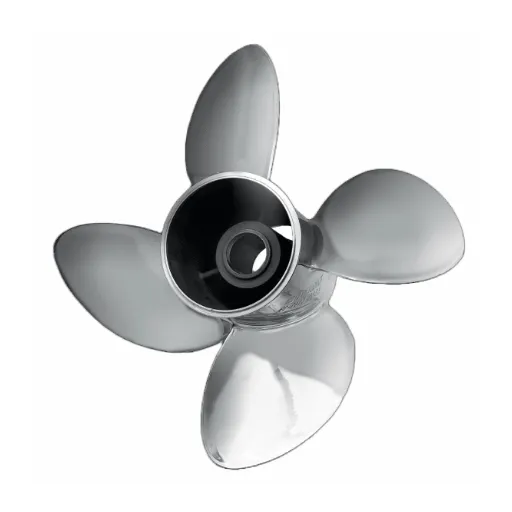
Choosing the wrong materials for your prop can present a range of problems affecting performance, wear, and ultimately, cost. Having learned this myself, the choice of materials should flow from a thorough understanding of operating conditions, with further considerations given to the application requirements. For example, water conditions, load demands, and engine type must be considered and matched against the material. Aluminum is lightweight and inexpensive, serving the purpose well enough in light, recreational work, while stainless steel is strong and resilient in rough water conditions or for high-performance purposes. Inefficiency, wear, and even catastrophic failure are the consequences of an incorrect match.
Aluminum
Lightweight & Economical
Best for recreational use
Stainless Steel
Strong & Resilient
High-performance applications
I’ve observed that rushing the material selection process hardly ever yields good results. During my early days as a prop designer, I chose a cheap and less durable material without adequately considering the kind of strain it had to endure. These materials underwent so much wear and tear that they wore out quickly and required continual repairs, thereby costing me more. Since then, I have consistently sought advice and weighed manufacturer guidelines alongside future considerations, such as potential changes in engine pairs or variations in usage. This approach ensures the considered material will be able to withstand performance demands while keeping its maintenance consequences at an acceptable level.
With the aim of avoiding the problems as mentioned above, I now consider material selection a key decision, rather than just an afterthought. Taking the time to exhaust all factors and consult reliable sources will not affect the prop, but will foster a longer life in it, besides advancing its effectiveness and performance in general. This experience has taught me that putting effort into something from the beginning saves a great deal of effort, as well as stress and money, later on.
Overlooking Maintenance Needs
Overlooking maintenance needs has been one of the most eye-opening lessons for me. I used to underrate the importance of regular upkeep, assuming that once a material or system was chosen, it would work with little, if any, intervention. Experience taught me quickly that neglecting maintenance created inefficiencies and higher costs, even to premature failures. Maintaining properly is not merely about carrying out routine tasks; it is an investment that extends the performance and lifespan of any material or system.
📋 Proactive Maintenance Approach
- Schedule regular inspections and follow service intervals
- Address minor issues immediately before they become major problems
- Document all maintenance work for comprehensive backup history
- Understand specific care needs of different materials
- Consider environmental stressors (heat, chemicals, wear)
The proactive approach I adopt involves scheduling regular inspections, striving to follow service intervals, addressing minor issues immediately if possible, and then working on major ones. Additionally, maintenance work is documented for a comprehensive backup history to refer to during troubleshooting or decision-making processes. I have informed myself with a bit of foresight, so downtime was far less unexpected, and the bill for repairs was much more affordable.
I have always maintained that one must understand the peculiar care needs of the materials with which one works. From the metal choice that cleans well, knowing which metals should be left alone, understanding environmental stressors ranging from heat to wearables to chemicals, to even the tool with which it is worked: small details count for long-term sustainability. This maintenance cannot be put aside for convenience because the profitable yield for any system is always performance, reliability, and cost-efficiency.
Reference Sources
-
How to Swap Your Prop – Mercury Marine
Offers a detailed guide on removing, inspecting, and replacing a boat propeller, including maintenance tips. -
Changing A Boat Prop – BoatUS
Provides step-by-step instructions for changing a boat propeller, from removing the cotter pin to securing the new prop. -
Video: How to Swap a New Propeller Onto Your Outboard – OnAllCylinders
Features a video tutorial on safely removing an old propeller and installing a new one, ensuring proper fit and function. - View for more details.
Frequently Asked Questions (FAQs)
How do I get a boat propeller off the prop shaft?
To remove the boat propeller from the propeller shaft, the first step is to secure the boat in a safe position. With a prop wrench or socket, loosen the prop nut. Once the nut is removed, check if a cotter pin is present and remove it as well. Pull the propeller straight off the shaft. However, if it is stuck, use a prop puller to gently pry it, ensuring that neither the prop nor the shaft gets damaged. Consider looking into the prop and shaft for any minor damage or corrosion before reinstallation.
What things will I need to change a boat prop?
To change a prop on your boat, you ideally want a prop wrench and socket set. Sometimes, you can also use a prop puller. Otherwise, a plier could come in handy for removing a cotter pin if one is holding the propeller in place. Grease is the following item you will want, as it needs to be applied to the prop shaft. This is to prevent corrosion during the installation process. Seemingly, a C-clamp could come in handy for holding parts together if necessary, and finally, a torque wrench may be needed to tighten that prop nut perfectly to specifications. Refer to your boat’s manual for any particular hardware your model requires.
Can I replace a damaged propeller with a stainless steel prop?
Yes, replacing the damaged propeller with a stainless steel one is always an option and preferred for its durability and performance. Stainless steel props are less susceptible to damage than aluminum ones and generally provide better thrust and fuel efficiency. However, ensure the stainless steel prop is sized correctly for your boat; otherwise, vibrations and other performance issues may occur. In any case, check with a prop shop or dealer about the correct prop for your needs. If you are buying a used prop, be sure to inspect it for any severe damage or bent blades.
What should I do if the fishing line is wrapped around the prop shaft?
Fishing lines may get wrapped around the propeller shaft. This area must be cleared out immediately to prevent damage. Where safe to do so, remove the boat from the water first. Using pliers, gently cut away and remove the fishing line. Once the line is cleared, examine the area around the propeller for any damage or wear. The prop shaft should be greased before reinsertion. If the prop or shaft sustains any significant damage, it is best to have it examined and repaired by a professional.
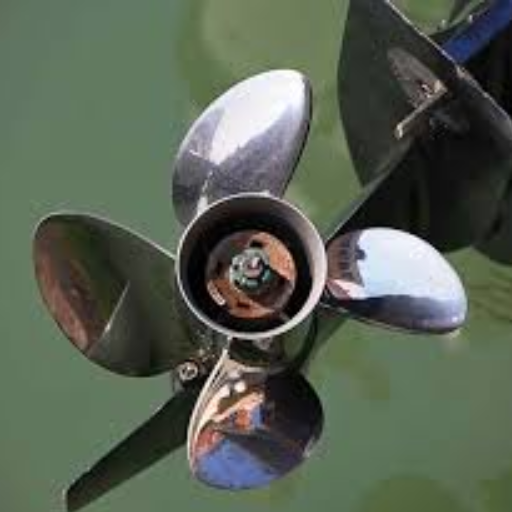
How frequently should boat owners go through an inspection of their boat props?
Boat owners should check their boat propellers at least once before the boating season. They should also do so periodically during the season. Regular inspection helps identify problems such as bent blades, corrosion, or minor damage, which can later lead to expensive repairs if left unaddressed. Check for any vibrations during operation, as they may indicate an imbalance or damage. Carrying a spare propeller is also a good idea for emergencies, especially when embarking on extended journeys. Ensure that during the inspection, the prop nut, thrust washer, seals, and any bearings associated with the prop shaft are all checked.
What is the best way to tighten the prop nut after changing a prop?
After the prop is changed, a good procedure for tightening the nut involves ensuring that the propeller is securely seated on the prop shaft. Use a prop wrench or socket to turn the nut clockwise, applying hard pressure on it. Be careful not to overtighten, as this could damage the threads or the prop itself. If your prop uses a cotter pin, ensure it is fully installed to prevent the nut from coming loose during operation. The standard rule of thumb is to tighten the prop nut until it feels firm yet still allows the prop to turn freely. Always check the recommended torque specified in your owner’s manual for safety.