A Mercury outboard engine requires regular maintenance for smooth and efficient boating; one of the most common maintenance tasks is changing the propeller. On one hand, you want to increase speed or better fuel efficiency; on the other, you want to know how to change a prop when it gets damaged. This guide will simplify and make the process stress-free. At first, changing a prop might look intimidating, but just having the right tools and instructions will make it an easy job for any enthusiast to do, and we are here to show you how. Full of valuable tips, step-by-step instructions, and expert advice on the must-know tools and techniques for 2025, this DIY guide will ensure that you can keep your outboard running at its best. Keep reading to find out everything you need for mastering this vital infusion skill!
Understanding the Importance of a Properly Functioning Propeller
Why Propellers Matter for Boat Performance
The propeller plays a critical role in affecting the overall performance, efficiency, and handling of a boat. It is the power-producing mechanism that converts engine power to thrust. Thus, it directly influences speed, fuel efficiency, and the maneuverability of off-shore. A totally damaged propeller will lose its propulsion abilities, causing the engine to be strained with excessive wear and tear.
Fuel Efficiency
10-20%
Improvement with proper maintenance
Thrust Loss
40%
With damaged blades
Blade Impact
Narrow = Speed
Wide = Heavy loads
Generally speaking, a properly maintained propeller will also improve fuel consumption by as much as 10-20% over time. In terms of acceleration and handling, propeller blade width comes into play: narrow blades are speed-oriented, whereas wide blades have more thrust to push heavy loads. Finally, correct propeller pitch ensures smooth operation by preventing improper rotation of the engine revolutions per minute (RPM) relative to the boat’s speed, thereby avoiding underperformance and overloading.
Conduct regular maintenance and inspections to prevent damaged blades, which could result in a nearly 40% loss in thrust. With consideration for blade condition and compatibility, you can ensure the safety of the boat and its efficient movement, allowing for maximum enjoyment of water adventures with low maintenance operational costs in the long run.
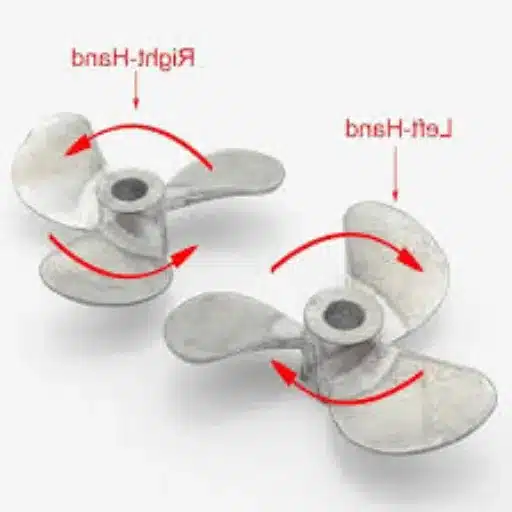
Typical Mercury Outboard Propeller Problems
While Mercury outboard propellers are very durable and can perform for extended periods, they do face various issues if not properly maintained or selected.
⚠️ Cavitation
One of these common problems is cavitation, wherein air bubbles form around the blades—often due to the improper design or configuration of the blades—and this eventually reduces efficiency and may cause damage to the propeller’s surface.
⚠️ Pitch Mismatches
Additionally, there are general pitch mismatches, which can cause misperformance at limited top-end speeds or higher stress on the engine.
⚠️ Bending or Distortion
Bending or distortion is also a prevalent issue. This may cause the entire propeller to vibrate and not work correctly.
⚠️ Corrosion
Corrosion is the other problem, particularly under saltwater conditions, as an uncoated propeller is prone to corrosion. Inadequate coatings against corrosion or the lack of sacrificial anodes can escalate corrosion.
⚠️ Improper Alignment
Proper alignment or installation of the propeller introduces mechanical strain, thereby contributing to premature wear of both the propeller and engine shaft. The propeller and the engine shaft may develop mechanical strain if not properly aligned or installed; this can potentially lead to premature wear.
Mercury Outboard propellers can extend their lifespan if subjected to regular inspections, along with necessary repairs, and usage appropriate to the boat’s requirements, thereby ensuring smoother and more reliable operation in the water.
The Time for Propeller Change in Mercury Outboard
Recognizing when to change the propeller on your Mercury Outboard is vital to keep it working efficiently, improve fuel efficiency, and further protect the overall health of the engine. A propeller that has been worn away or damaged by weather conditions can increase fuel consumption, reduce speed, or render handling more difficult. Below are some main indications pointing to the replacement:
🔍 Visible Damage
Check for cracks, nicks, bends, or other deformities on the blades. Physical damage will reduce the efficiency of your propeller and strain the engine.
📉 Performance Decline
If you have noticed that your boat is having a hard time reaching its usual top speed or is slow to accelerate, then this is one of the signs that the propeller is no longer efficient.
🌊 Vibration
Abnormal vibration may occur in your boat during operation if its propeller is damaged or out of balance, causing discomfort in the ride and potentially damaging your engine components if left untreated over time.
⛽ Poor Fuel Consumption
A drop in fuel efficiency typically indicates that the propeller is not generating the correct thrust. This could be because the blades are worn or the pitch angle is not accurate.
⚙️ Wrong Pitch or Diameter
Using a propeller whose specifications are incorrect for your Mercury outboard can adversely affect performance, and long-term damage may also occur. It is preferable to verify that the propeller meets the requirements specified by the engine manufacturer.
🚨 Engine Overload
When the engine runs at unusually high RPMs but the boat refuses to accelerate, it indicates that the propeller may be undersized or has excessive wear, thereby hindering its effectiveness.
All of these concerns, once addressed promptly through inspection and replacement of the propeller, have a positive impact on maritime operations. Also worthy of consideration is consulting a marine mechanic or a Mercury-certified technician when in doubt about the necessity of replacement. Regular maintenance and timely replacement maintain efficiency at its peak, maximize the longevity of the outboard motor, and provide enhanced safety on the water.
Step-by-Step Guide to Removing the Outboard Propeller
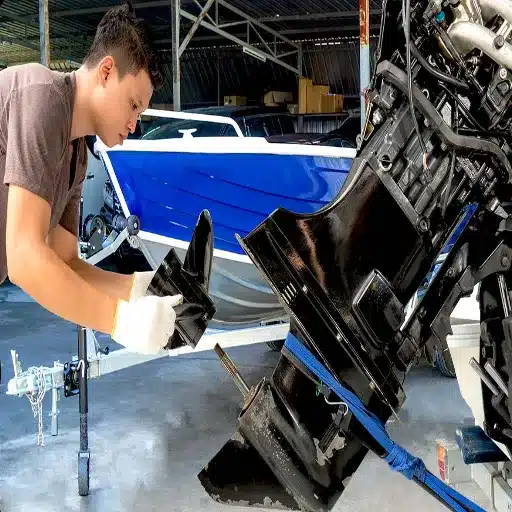
Preparing Your Mercury Outboard for Propeller Removal
🔧 Essential Preparation Steps
Proper preparation will ensure a smooth and successful propeller removal. The engine is switched off, and the key is removed so that there is no chance of accidental motor start-up. Keep the outboard motor in neutral and tilt it securely upward so that it will not hinder access to the propeller. A sturdy motor stand should be used to prevent any movement, or the boat should be securely docked. Wear protective gloves to guard against sharp objects, and use tools such as a prop wrench to loosen the hardware. Check the propeller and its surroundings to clear out any debris or fishing lines that may hinder the process. The above preparations will help safeguard the equipment, simplify removal, and create a safe working environment.
Performing the Removal of the Propellers Safely
To remove the propeller safely, here are the detailed steps to follow for scrutiny and to preserve equipment and manpower:
- Secure the Work Area: Begin by stabilizing either your boat or motor stand. The ship needs to be docked or on a stable surface so that it does not move once you are set to work. Any untoward slips can cause injuries or damage to the equipment.
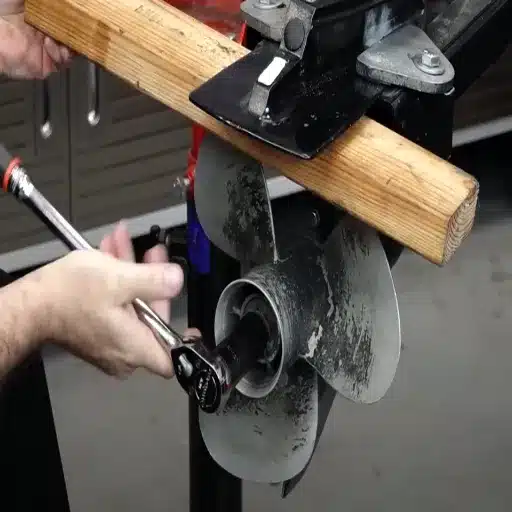
- Prepare the Necessary Tools: All tools required for the job must be gathered before commencing the work. A prop wrench will enable you to loosen the hardware efficiently. A pair of gloves is essential for protection against sharp edges or debris from the propeller blades. Have marine grease or anti-seize lubricant handy for reinstallation.
- Remove the Prop Nut and Washer: Use the prop wrench to loosen and remove the prop nut. Keep the washer and nut once removed, as you will require them later for reinstallation. Check for any sign of wear or damage on the threads and replace if necessary.
- Check for Debris: Before sliding off the propeller, check if any fishing lines, weeds, or other debris are tangled therein. Such items may hinder performance and should be removed from the shaft to prevent further issues. Use a flashlight when necessary.
- Slide the Propeller Off Gently: Pull the propeller off the shaft gently, preferably using both hands. This must be done carefully to avoid scratching or bending the blades. If one does feel as if it is stuck, do not force it; instead, check once more for obstructions or use an appropriate removal tool.
- Inspect the Propeller Shaft: Once all the debris is removed, the shaft should be meticulously inspected for signs of wear, corrosion, or damage incurred from fishing lines. Clean the shaft with a soft cloth and apply a thin layer of marine grease to prevent corrosion and facilitate the subsequent installation of the propeller.
Ensuring these steps are taken assures safe and effective processing and, correspondingly, the integrity of your equipment. Safety must always come first, along with proper tools that make removal easy. Regular maintenance can lengthen the life of the propeller with its related parts, including inspections and cleaning of the shaft.
Troubleshooting Common Removal Issues
It’s not unusual at all to encounter problems while removing the prop, and knowing how to resolve them would undoubtedly save time and prevent damage.
🔒 Seized Propellers
One prevalent issue is seized or stuck-on propellers, resulting from prolonged water exposure and corrosion. If you have problems of this nature, first apply penetrating oil to the hub, letting it soak in for a few hours to break the bond. If the problem persists, a propeller puller may be required to exert the large forces necessary to dislodge it safely from the shaft without causing any damage.
🔩 Damaged Fasteners
Peculiar to various scenarios is the trouble presented by damaged or incipiently stripped fasteners, which hinder their removal. Correct use of tools like a socket wrench and good pliers ensures a proper grip and the secure turning of fasteners. If it happens to be a case where fasteners are too worn out, a bolt extractor may come in handy; otherwise, one could consider asking a marine repair technician for help.
📐 Insufficient Clearance
Also, an insufficient clearance around the propeller may hinder removal efforts, especially on boats where the stern spaces are tightly confined. Reorienting the angle of the ship by slightly adjusting the motor’s trim can make it more accessible. Look for debris such as fishing line or superficially wrapped rope around the shaft, as these need to be cleared.
Regular maintenance routines and proper use of tools would be helpful for addressing these problems promptly while protecting one’s equipment.
Installing a New Propeller on Your Mercury Outboard
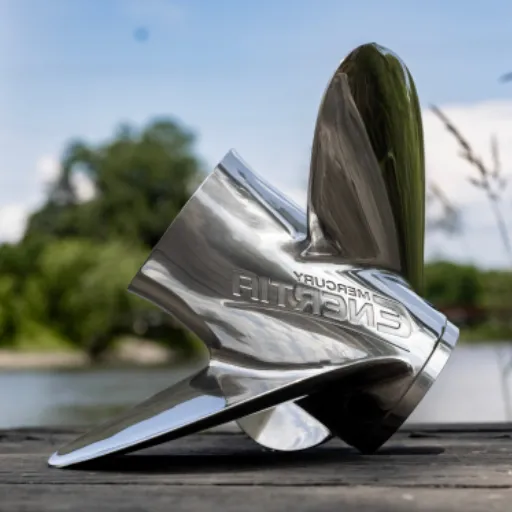
Selecting the Great Replacement Propeller
Selecting an expert propeller is paramount in enhancing the performance, fuel economy, and handling of a Mercury outboard. First, consider the pitch and diameter of the propeller. These are the primary factors that distill engine power into the actual speed of the craft itself. A low pitch is designed for heavy loads or towing applications, while a high pitch is intended for greater top-end speed with lighter boats. Mercury’s propeller sizing chart can be referred to ensure compatibility with your engine model.
| Propeller Type | Material | Best Application | Key Benefits |
|---|---|---|---|
| Low Pitch | Aluminum/Steel | Heavy loads, towing | Better acceleration, more torque |
| High Pitch | Stainless Steel | Lighter boats, speed | Higher top-end speed |
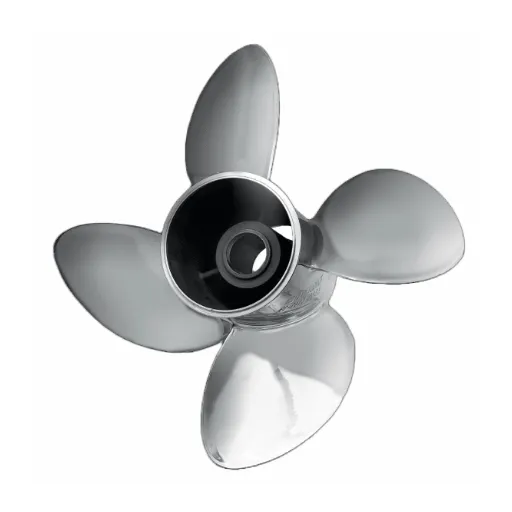
| 3-Blade | Various | General purpose | Versatile, good speed/maneuverability balance |
| 4-Blade | Stainless Steel | Watersports, stability | Better control, stability at low speeds |
Another important thing that has to be emphasized is the material. Aluminum propellers tend to be lightweight and inexpensive, making them best suited for recreational boats. In contrast, stainless steel ones will last a lot longer and give you a bit of a performance edge, especially if rough waters or high-speed applications are on the menu.
You will want to make sure the blade count is also analyzed. It will affect thrust and acceleration. Three-blade props are generally more versatile and strike a suitable balance between speed and maneuverability. In contrast, four-blade ones yield better control, especially in watersports, and stability when at slower speeds. When installing a new prop or replacing an existing one, always use a prop hub kit that matches your Mercury engine to avoid compatibility issues.
Also, analyze the boating conditions you face daily: water depths, expected cargo weight, and usual operating speed. Verify these requirements by testing them under these conditions, ensuring your choice is on the right track. Regular inspections of the propeller after installation will ensure it continues to function correctly for an extended period.
Step-by-Step Installation Process
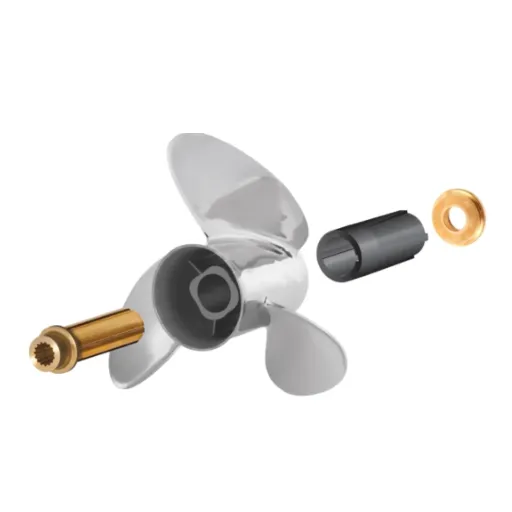
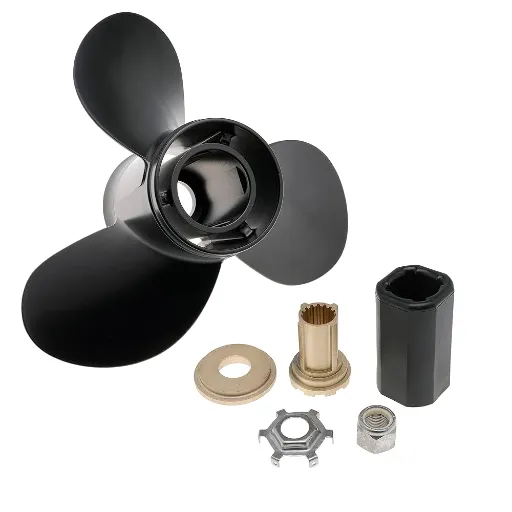
- Inspecting the Propeller and Hub Kit Components: Carefully unbox and inspect the propeller and hub kit components for any damage or defects that may hinder installation or performance. To verify that all parts correspond to the Mercury engine’s specification requirements.
- Prepare the Engine Shaft: Cleaning the engine shaft to remove debris, corrosion, and greasy deposits is essential. It will make a fitting surface, thus avoiding unnecessary wear and tear. Apply a marine-grade grease coating to the shaft to facilitate the smooth installation of the hub and prevent it from seizing.
- Install the Hub Kit: Align the hub kit with the engine shaft in the proper orientation as recommended by the manufacturer. Slide the hub firmly into its seat. Check once more to ensure that the splines on the hub and the engine shaft match perfectly, as they may be accidentally misaligned.
- Position the Propeller: Slide the propeller carriage carefully along the shaft until it reaches the hub kit. Ensure that the blades are positioned on the sides opposite to the engine angle, allowing them to deliver full thrust and remain well-balanced once in operation.
- Attach the Washer and Prop Nut: Next, attach the thrust washer to the shaft, followed by the prop nut. Just hand-tighten the nut; that will hold the propeller there. Using a torque wrench, tighten the nut to the specified torque setting. This setting is stated in the engine manual.
- Install the Cotter Pin (if Applicable): If your Mercury engine model uses a cotter pin, insert it through the hole in the prop nut and bend the ends of the pin to secure it in place. It basically prevents the propeller from coming loose during use.
- Perform a Final Check: Rotate the propeller by hand and observe that it should move freely without resistance or wobble. Ensure everything is fastened, tightened securely, and aligned. Different sayings: This particular action is crucial for uncovering any mistakes in the installation before you put yourself (and your vessel) out on the water.
- Testing in Water: After installing, the propeller must be test-run in water under controlled conditions. During the run, the operator should monitor propeller performance for any unusual noises or vibrations. Verify whether the engine achieves the expected RPM range under normal operating conditions.
Following this procedure ensures an easy installation of your Mercury propeller, resulting in reliable performance and long life.
Importance of Propeller Alignment
⚖️ Critical Performance Factor
10%
Speed reduction from misalignment
↑
Increased drag
⚠️
Component wear
Before being able to fully capitalize on the performance and operational efficiency of the boat, proper propeller alignment must be undertaken. Propellers misaligned result in fuel wastage, decreased speed, and a heavily stressed engine; in the long run, this could cause severe damage to the vessel. The study demonstrates that even slight misalignments can significantly deteriorate thrust efficiency, resulting in a reduction of approximately 10% in the maximum speed of a boat, while drag increases disproportionately. On the other hand, propeller misalignment may create undesirable vibrations that affect not just onboard comfort but also accelerate the wear and tear of critical components such as bearings and seals. Aligning them properly during installation will avoid this risk and will allow for a smoother ride, much easier maneuverability, and greater longevity of the equipment. If examined regularly and adjusted when required, the alignment would be maintained over time.
Maintenance Tips for Your Mercury Outboard Propeller
Regular Checks and Maintenance Procedures
Maintaining your Mercury outboard propeller ensures its safety, optimal performance, and durability.
🔍 Visual Inspection
First, check the propeller regularly for visible signs of damage. These might be cracks, dents, or effects of erosion. These imperfections reduce the efficiency of the propeller and may, over time, damage the outboard system. Also, check for wear or slippage in the propeller hub to confirm it is firmly in place and operating correctly.
🧹 Debris Removal
Keep an eye out for debris or fishing lines that may wrap around the propeller shaft. Such obstructions could lead to seal damage and water ingress, resulting in your engine underperforming. Cleaning the propeller and shaft is good preventive maintenance.
🔧 Torque Checking
Another essential step is checking the propeller nut torque. Having loose nuts or ones that are tightened improperly will lead to vibration and, in worst cases, to the loss of a propeller during operation. Confirm with a torque wrench that the torque values stipulated in the manual were adhered to for tightening the nut.
🛢️ Lubrication
Never forget to grease these for future maintenance. Whenever the propeller is removed or refitted, apply marine grease to the shaft to prevent corrosion and make any future removals easier.
Having a spare propeller and tools onboard at all times for emergencies is extremely prudent. Having the right tools can prevent a short sailing trip from being cut short due to sudden damage. Following these instructions will help you keep your Mercury outboard propeller operating at its best and prolong its life.
Keeping a Spare Propeller: Why It Is a Must
🚁 Emergency Preparedness Statistics
Propeller failure accounts for a significant percentage of on-water breakages
Having a spare propeller is a viable precaution for any boater. Given the road less traveled and the unforeseen damage that an unexpected collision or gradual abrasion could cause, if your primary propeller gets damaged severely, you could drift into an unwanted situation and have a far shorter time for your plans. Boat propellers undergo tremendous stress, and a slight nick or bend can cause deterioration in performance of the propeller, increased fuel consumption, and strain on your engine.
Statistics reveal that propeller failure accounts for a significant percentage of on-water breakages; hence, having a backup at hand becomes one of the imperatives. A spare propeller guarantees the quickest replacement for a damaged one, along with peace of mind during any unforeseen circumstance. To complement your preparedness, your spare propeller should be a precise fit in terms of pitch and diameter (and even in terms of material) for your boat, so that it can efficiently serve as a replacement. Going the extra mile makes you safer and guarantees performance while avoiding expensive hiccups in your outings on the water.
Proper Storage for the Spare Propeller
1. Thorough Cleaning
Nailing down a storage method for your spare propeller will prolong its lifespan and ensure it’s available at short notice. First, a thorough cleaning removes salt, debris, and grime from the propeller surface, which, otherwise, could cause corrosion over time.
2. Complete Drying
Once cleaned, dry it thoroughly, as any trace of moisture may initiate rusting, especially in metal propellers.
3. Protected Storage
The propeller is then placed in a designated case or padded container for protection against scratches and impact. Ensure the storage area is dry, cool, and out of direct sunlight, as sunlight can degrade the material.
4. Organization & Labeling
For occasional boating or for large vessels, labeling and sorting spare props according to size and type would probably make replacement quicker.
5. Regular Inspection
Regularly inspect the spare propeller for signs of wear or damage, ensuring it is always in optimal condition for use.
These are some ways in which the spare can be kept intact and efficient, assuring a better boating experience.
Future Trends in Mercury Outboard Propeller Technology
Innovations in Propeller Design for 2025
Alongside other breakthroughs for 2025, Mercury outboard propeller technology will feature improvements in efficiency, sustainability, and innovative design.
🔬 Advanced Materials
One notable innovation will likely involve the application of advanced materials, such as their integration into lightweight composite structures or corrosion-resistant alloys, which can provide longevity while contributing to reduced fuel consumption by lowering drag. These materials have been designed to withstand the harsh marine environment while extending the propeller’s lifespan.
🖨️ 3D-Printed Propellers
The next major trend is the emergence of 3D-printed propellers. This technology enables fine-tuned commercial customization, tailored to specific boating needs, resulting in enhanced performance for various vessel types and water conditions. It also supports rapid prototyping to reduce time frames in blade geometry development.
📡 Smart Sensors
Transformations in propeller performance monitoring will occur with the integration of smart sensors into propeller systems. Sensors monitor parameters such as rotation speed, water temperature, and torque, providing real-time data that allows boat operators to optimize for maximum efficiency and safety based on the information.
🌱 Environmental Focus
Finally, the reduction of the environmental impact of boating has come to the forefront, prompting designers to invest engineering efforts in creating new propellers that can reduce underwater noise, thereby benefiting marine ecosystems, and improve energy transfer for better fuel economy.
These innovations put Mercury outboard propellers at the forefront of marine technology in response to modern demands for enhanced propulsion systems in this drastically changing industry.
Environmental Considerations in Propeller Manufacturing
Propellers are increasingly becoming environmentally conscious, in line with modern standards.
♻️ Recyclable Materials
With a greener reputation, manufacturers are adopting materials considered recyclable, such as aluminum and stainless steel, which ensure durability and help limit long-term environmental impact. These materials can be reused in a recycling economy for the marine industry.
⚡ Energy-Efficient Manufacturing
The manufacturing phase is also focusing on being energy-efficient to reduce carbon emissions. Facilities are utilizing resources optimally and accessing renewable energy sources, such as solar or wind energy, in their operations. These objectives in ecology are further attained by reducing the abandonment of scrap metal in the waste and innovating in casting methods.
🐟 Marine-Safe Coatings
Another critical issue to consider is pollution prevention. The propellers require advanced coatings to minimize marine biofouling, which, in the bio-activity process, could deposit harmful substances in the water and disrupt aquatic life. These coatings are eco-friendly and non-toxic, offering sustainable alternatives to traditional antifouling methods.
These measures are at the forefront of change in the industry, aiming to tackle the global climate problems while maintaining a balance between performance and the marine environment. With increasing regulatory pressures and shifting consumer preferences, eco-friendly manufacturing will continue to shape the future of propeller production.
How to Stay Updated with Mercury Outboard Resources
🌐 Official Resources
I must juggle several channels to stay informed about most Mercury Outboard resources. The official Mercury Marine website is my primary resource, offering detailed product guides, service manuals, and the latest news on new technologies and marine innovations. I also subscribe to their newsletter to receive regular updates in my inbox, including product announcements, maintenance tips, and exclusive offers.
📱 Social Media
I also follow Mercury Marine on Facebook, Instagram, and YouTube to stay connected to their community and enjoy their content, including tutorial videos, customer success stories, and insights from industry experts. These platforms keep you updated on events, webinars, and the latest trends impacting the marine sector.
👥 Community Forums
Lastly, joining boat-related forums and groups keeps me up to date and allows me to interact with like-minded souls. These communities usually provide excellent insights, firsthand experiences, and even announcements of Mercury Outboard products. Incorporating such bits of knowledge ensures that I have every piece of information readily available to maintain and optimize my marine equipment.
Reference Sources
-
How to Swap Your Prop – Mercury Marine: Provides a detailed guide on removing and replacing a propeller, including tools and safety tips.
-
How to Install a Propeller on a Mercury Outboard? – PartsVu: Offers step-by-step instructions for changing a Mercury outboard propeller, with a focus on proper installation techniques.
-
How to Install a Propeller on a Mercury Outboard? – PartsVu: Another detailed guide from PartsVu, covering the process of propeller replacement with practical tips.
- Click here to read more.