An outboard propeller must be appropriately installed to uphold the marine engine’s performance, fuel efficiency, and reliability. For a seasoned boatman or one gaining experience in installing this unit, a detailed understanding could save time, money, and aggravation. This guide provides all the essential tips for 2025, ensuring your propeller is fitted correctly and securely. We will take you through everything you need to understand to maintain your boat running at peak efficiency, from understanding modern advances in propeller design to common installation errors. Continue reading to train yourself.
Understanding the Importance of a Proper Boat Propeller Installation
Importance of Selecting the Right Propeller
Choosing the right boat propeller is crucial for optimal performance, improved fuel efficiency, and extended engine lifespan. For example, propellers should maintain engines at the recommended RPM to prevent unnecessary wear and maximize thrust. A propeller that is wrongly pitched or diametered will absorb more fuel and less speed, placing undue strain on the engine.
Modern advances in propeller design have incorporated state-of-the-art materials, including stainless steel and composite alloys, to enhance both durability and efficiency. Variable pitch and blade geometry customization now allow sailors to fine-tune the propeller to meet their specific performance needs, including speed, towing, or cruising.
Industry Insight: Industry data show that a boat with the wrong propeller can lose up to 15% of its fuel efficiency, thereby influencing operational costs and environmental sustainability.
To avoid such disadvantages, one must consider hull type, engine power, and intended use when selecting a propeller. Ensure proper installation and repair for maximum performance, thus maintaining the operational integrity of your vessel.
Influence of Propeller on Boat Performance
A certain degree of performance can be expected from the boat, provided the correct speed and maneuverability are imparted by the propeller. Furthermore, with the proper propeller selection, one can achieve improved fuel economy and minimal engine wear. For instance, research has shown that pitch matters; much power amplification can be gained by higher pitch propellers, which become heavy for the engine when falsely matched. Low-pitch propellers will give you quick acceleration at the expense of top speed.
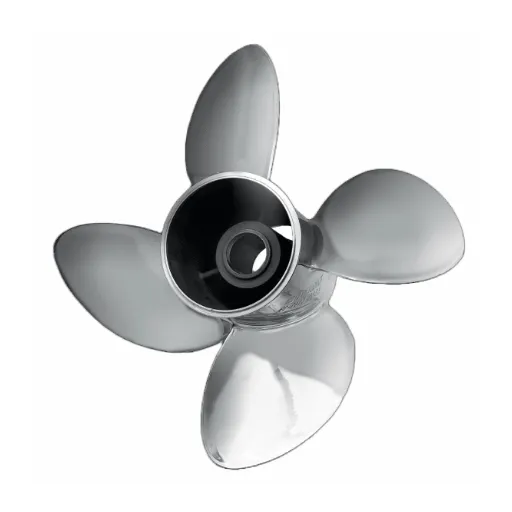
Blade count can also be very important. While a three-blade prop is good for speed and smooth rides, four-bladers offer better grip and stability, especially in choppy waters or when dealing with heavier loads. Moreover, the material of a propeller contributes to its longevity and performance. Aluminium propellers are cheaper and lighter. Stainless steel counterparts are heavier and allow for precise shapes, points often highlighted in high-performance use.
Optimized efficiency can be achieved through cupped blades and rake adjustment that allow for propeller fine-tuning to meet the exact requirements of a vessel. Regular maintenance, consisting of cleaning and balancing, will keep the propeller in mint condition and further enhance its performance. This way, energy will be saved, engine life will be prolonged, and both performance and cost factors will be improved.
Common Mistakes in Prop Installation
A wide range of performance issues, inefficiencies, and even vessel damage can arise from improper prop installation. Commonly seen is the situation where the propeller’s specifications (namely, diameter and pitch) are not chosen in accordance with the vessel’s engine and operating requirements. This mismatch would typically result in poor fuel economy, reduced speed, and ongoing engine stress. Another improper scenario is the misalignment of the propeller during installation, which can cause vibrations that wear down both the propeller and the drivetrain.
Critical Installation Errors:
- Using incorrect torque specifications
- Neglecting marine-grade grease application
- Improper propeller alignment
- Failing to clean hub and shaft before installation
Another common mistake is forgetting the last and most crucial step: using the right tools, such as a torque wrench. This can result in an under-tightened or over-tightened propeller shaft nut; the former may allow the propeller to come loose during operation, while the latter could damage the threads. Another mistake is neglecting to apply marine-grade grease, which provides corrosion protection and can prevent parts from seizing over time. Likewise, failing to inspect and clean the propeller hub and shaft before installation can embed debris or irregularities that affect fit and performance.
Therefore, the manufacturer guidelines must be followed meticulously to avoid all such mistakes and to perform regular inspections, ensuring cleanliness and proper securing of all components. By taking care of these details proactively during propeller installation, the vessel’s efficiency is enhanced, and long-term maintenance costs are reduced.
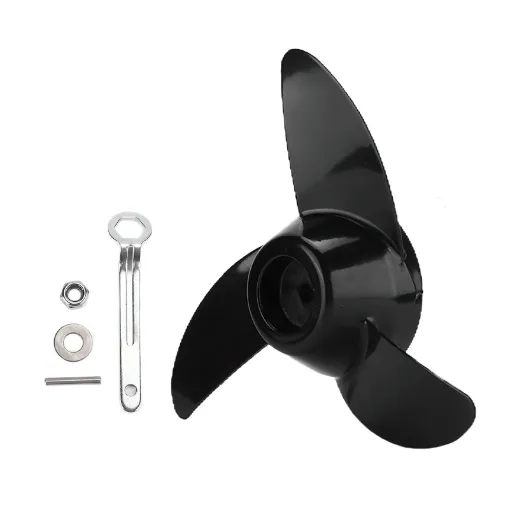
Essential Tools and Equipment for Changing a Boat Prop

Must-Have Tools for Propeller Installation
Changing or installing a boat propeller requires smooth and efficient operation, necessitating the use of superb tools. Here is a list of the essential tools and equipment that every boat owner should contemplate:
🔧 Propeller Wrench
A propeller wrench is designed to fit snugly over the propeller nut, securing it without damaging the nut or the surrounding areas. Choose one made from materials that are durable and resistant to corrosion, such as plastic or rubber-coated metal.
⚡ Puller
If corroded or old, the propeller can be very difficult to extract. The prop puller exerts even pressure on the propeller to remove it without scoring the prop shaft or damaging anything else.
⚖️ Torque Wrench
It maintains the specified torque of the propeller nut by the manufacturer. If the prop is loose or tightened beyond the recommended torque, affecting its performance, there is no hitch from it.
🛢️ Marine Grease
Applying marine grease or an anti-seize compound to the propeller shaft ensures easier removal and provides a measure of protection against corrosive effects. These compounds are crucial for sustaining the functional life of the shaft and propeller.
📌 Cotter Pins
Cotter pins secure the propeller nut during operation. Having new stainless steel cotter pins ensures the prop is locked in place.
🔧 Pliers
These bend cotter pins into place or remove worn-out ones. A good set of needle-nose or locking pliers will help in tight spaces.
Additional Essential Items:
- Cleaning Materials: Use a wire brush and cloth to clean away any debris, old grease, or corrosion from the propeller shaft before installing the propeller.
- Gloves and Safety Equipment: Protective gloves will ensure a firm grip on any tool and prevent accidental cuts from the sharp edges of the propeller.
These instruments, when used correctly, ensure that the propeller is safely and efficiently installed, thereby avoiding common problems such as imbalance or misalignment. A good-quality tool, however, will protect one’s equipment from damage and help maintain its performance and reliability while on the water.
Safety Equipment One Should Consider
When working on propeller maintenance or installation, it is essential to ensure the presence of all necessary safety equipment to minimize risks and ease the process. Among these, high-quality gloves are required, made preferably of cut-resistant material to protect hands from sharp edges and accidental slips. Safety goggles protect the eyes from debris that may be thrown around during cleaning, sanding, or installation. Establishing a stable working bench that prevents slipping provides stability to the process, helping to avoid accidents.
Working in environments where fumes or dust are present, a certified respirator will protect your lungs from harmful particles. Ear protection, such as noise-canceling earmuffs, is beneficial when working with loud power tools. Finally, keeping a first-aid kit within reach allows for dealing with minor injuries instantly, a recipe for being well-prepared.
Investing in and frequently using this safety gear would not only protect you but also make your work easier and more precise, instilling confidence to ensure that the boat is operating at its best. The cutting-edge stuff for 2025 to simplify installation.
Top Innovative Tools for an Easier Installation
The year 2025 has brought several developments into the processes that facilitate installation across sectors. These innovations entail smart torque wrenches with digital displays and wireless connectivity. These offer feedback on the spot during assembly for accurate tensioning. They eliminate the guesswork, increasing both precision and confidence.
2025 Innovation Highlights:
- Smart torque wrenches with digital displays and wireless connectivity
- Modular assembly kits integrated with augmented reality (AR) systems
- Multi-purpose power drills with interchangeable heads and speed control
The other breakthrough can be attributed to modular assembly kits integrated into augmented reality (AR) systems. An AR device can overlay a step-by-step visual guide onto a user’s field of work, effectively reducing errors and installation time. Multi-purpose power drills are also a new breed of tools that feature interchangeable heads and speed control capabilities, allowing users to switch tasks smoothly without needing to carry additional equipment.
The new-generation tools, designed for efficiency, also prioritize safety, which is essential for their widespread adoption. Minimizing complexity and maximizing accuracy, these tools have set a benchmark for applications to be addressed in 2025.
Step-by-Step Guide for Installing a New Outboard Propeller
Step 1: Preparing Your Boat for a Propeller Change
🚤 Pre-Installation Checklist
- Dock your boat in a stable and secure location
- Ensure engine is off and key is removed
- Put on safety gloves
- Organize all necessary tools
- Inspect current propeller setup
Proper preparation of your boat is necessary to ensure a smooth and efficient propeller change. First, dock your boat in a stable and secure location. If you are on water, anchor the boat or put it on the trailer to gain better access. Ensure that the engine is off and the key is removed from the ignition, so that no one can start the engine by accident while changing the propeller. Put on your safety gloves and set your tools next to you to facilitate the process, whether it’s a wrench or a plier-type tool.
Before removing the old propeller, scrutinize the current setup and check for any wear, damage, or debris on the shaft. Remove any fishing lines, weeds, or other debris that may be entangled on the shaft because they will interfere with the removal or installation of the propeller. Finally, be aware of the new propeller specifications, such as diameter and pitch, to ensure its proper fit for the engine and meet the performance criteria of your boat. These preparatory steps minimize adverse situations to maximize time and effort during propeller replacement.
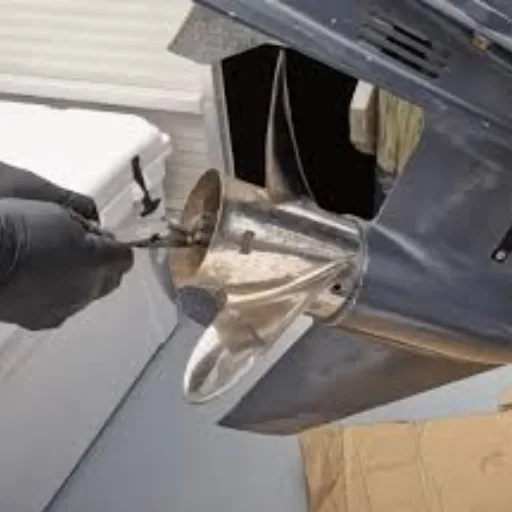
Step 2: Safe Removal of the Old Propeller
⚠️ Safety First – Removal Process
- Tie boat securely to prevent movement
- Set engine to neutral and lock power supplies
- Locate and remove cotter pin with needle-nose pliers
- Unscrew propeller nut with appropriate wrench
- Carefully remove propeller from shaft
Removing the old propeller requires close attention and safety measures to ensure that the equipment is neither damaged nor anyone is injured throughout the process. Start by tying the boat up to something solid so that it does not shift or move around during the process. Set the engine to neutral and lock out any power supplies to prevent the propeller from accidentally starting to move.
Next, locate the nut on the propeller, which is often secured either by a cotter pin or a lock nut. To remove the cotter pin, straighten out its ends with a pair of needle-nose pliers and gently pull it out. If it has a lock nut, proceed to unscrew it with the wrench or socket. Remember to keep them aside for installation later.
After this, proceed to roll out the propeller from the shaft. If it feels bound, apply light and even pressure while wiggling it gently sideways. Too much force or the use of any sharp tool may cause damage to the propeller shaft. Check the splines on the shaft for any rust, buildup, or wear and tear, and clean them thoroughly with a cloth or brush if necessary.
Lastly, check to see if there might be some kind of damage or excessive wear on the old propeller, which might be caused by improper alignment or an impact with water debris. This inspection could then help identify potential problems that may recur with the new propeller. A well-followed safety procedure and step-by-step approach will make the removal task smooth and efficient, hence making an easy installation possible.
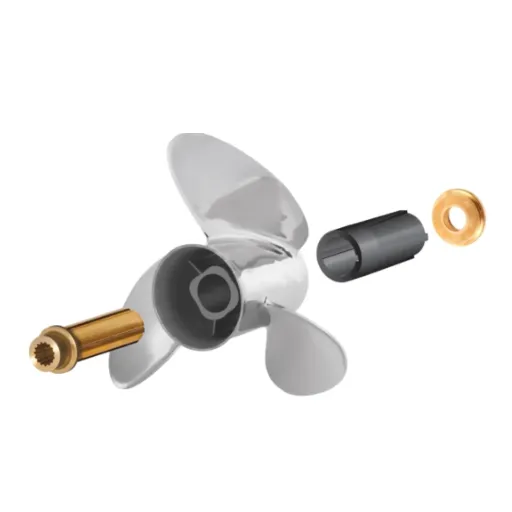
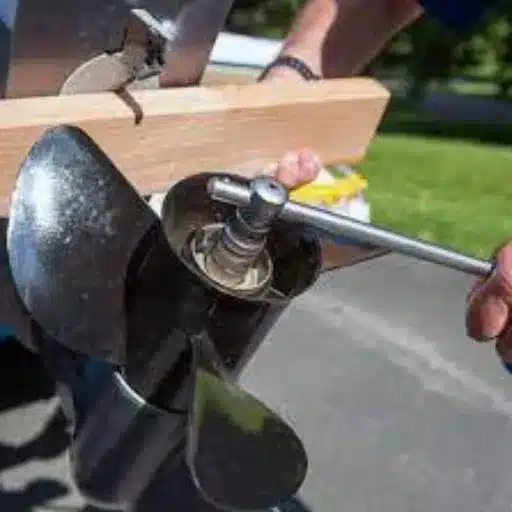
Step 3: Installing New Prop: Tips and Tricks
✅ Installation Best Practices
- Clean prop shaft thoroughly
- Apply light coat of marine grease
- Align splines correctly
- Install hardware in proper sequence
- Tighten to manufacturer specifications
- Install locking mechanism
- Test rotation by hand
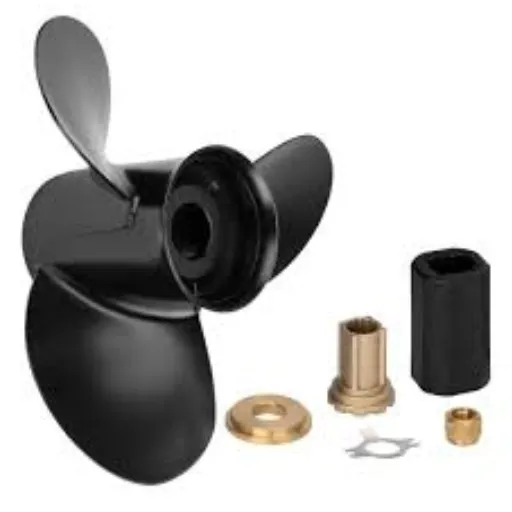
Technical details are crucial when installing a new propeller, as it must be installed correctly for it to operate safely and optimally. Firstly, clean the prop shaft very well so that neither dirt nor grease can interfere with the new prop sitting properly on it. Then, apply a very light coat of marine grease to the shaft: it will prevent corrosion and also make removal easier in the future.
Position the new propeller carefully on the shaft, ensuring the splines are correctly aligned. Slide it gently without applying force, ensuring it fits snugly against the surface. The hardware is to be installed, beginning with the thrust washer, if present, and then the propeller nut. Using a torque wrench, tighten the nut to the level designated by the manufacturer. Too much torque poses a danger to the bearings; conversely, too little torque would allow the propeller to become detached during use.
Use a locking device to prevent the nut from loosening with propeller operation. This could be a cotter pin or a locking tab washer, depending on your propeller setup. This step is crucial in ensuring the system operates safely and preventing accidents.
Finally, conduct a quick test by rotating the propeller by hand to ensure it spins freely without binding or resistance. Double-check all components for proper installation and refer to your engine or propulsion system manual for any specific instructions. Following these detailed steps ensures a safe and effective installation of your new propeller, thereby maximizing the performance and longevity of your watercraft.
Reasons to Remove and Swap Your Outboard Propeller
Spotting Damage or Wear on Your Propellers
🔍 Warning Signs of Propeller Damage
- Visible dents, cracks, or blade distortion
- Reduced speed or acceleration at normal RPMs
- Chips or rough surfaces on blade edges
- Excessive vibration during operation
- Misalignment or excessive play in propeller hub
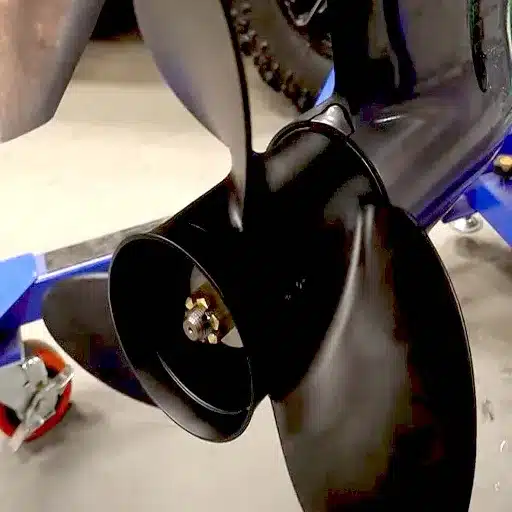
An outboard propeller that has seen better days can definitely bring performance, efficiency, and safety into the picture with potential challenges. Some classic indicators include visible dents, cracks, or distortion on the blades leading to uneven rotation and vibrations being built up. Another sign might be a fall in the speed or acceleration of a watercraft with normal RPMs from the engine, or inefficient thrust being produced by the propeller. Check to see if the leading and trailing edges of the propeller have any chips or rough surfaces, as these can interfere with the flow of water and exacerbate cavitation problems. Misalignment or excessive play in the propeller hub can be noted as internal wear or damage, which pose a serious threat to stability and control.
Performance Impact: Recent data suggests that slight imperfections in propeller could cause up to 10% loss in fuel efficiency, making timely inspection and maintenance an absolute necessity.
Regular inspections of your propeller aid in the early identification of wear, prior to damage spreading to the drivetrain of your engine. It is worthwhile spending some time doing these checks to ensure top performance and a longer life for your outboard motor.
Upgrading for More Power
Upgrading the propeller on your outboard motor is one of the best ways to increase power and efficiency. Contemporary propeller designs utilize advanced materials such as stainless steel in combination with computer-assisted blade shapes to eradicate drag and maximize thrust. For instance, changing an aluminum propeller to a stainless steel propeller would increase life and help in acceleration, given that the latter is more rigid and better constructed.
Upgrade Benefits:
- Up to 15% increase in fuel efficiency
- Improved acceleration and handling
- Enhanced durability and longevity
- Better performance customization options
In other words, customization through upgrades will cater to additional special needs, such as higher speeds or better fuel efficiency. Proper pitch and diameter selection is crucial, as these two factors will cause the engine RPM to change and affect the workings of the boat. Research shows that propeller optimization can increase fuel efficiency by as much as 15% and allow for smoother handling. Regular consultation with marine specialists who use performance analytics will keep owners informed and make their boating experience a pleasure while increasing equipment life.
Environmental Factors Affecting Propeller Longevity
| Environmental Factor | Impact on Propeller | Prevention Method |
|---|---|---|
| Salt Water | Accelerated corrosion, especially on aluminum and steel | Regular freshwater flushing, anti-corrosion treatments |
| Sediments & Debris | Surface abrasion and wear on blade edges | Avoid shallow waters, regular inspection |
| Extreme Temperatures | Material property changes, potential cracking | Proper storage, temperature-appropriate materials |
| Marine Growth | Reduced efficiency, increased drag | Regular cleaning, anti-fouling treatments |
The environmental conditions that do affect the time span and operation of a propeller greatly are numerous. Salinity of water is an environmental factor. It results in corrosion due to extended exposure to salt water, particularly for aluminum or steel propellers that do not have adequate coating. Solid materials and sediments in the water might have abrasive effects; they gradually incur wear and tear on the surface. Therefore, granite, quartz, or sand becomes an agent causing an accidental surface treatment of thin debris within shallow waters, more so for damage.
The water temperature has its effect as too much heat tends to alter the material properties, particularly for non-metallic-type propellers, which, in the long run, diminishes the structural strength. Yet, in certain materials, cold waters will increase brittleness and mount a risk of cracking. It has been discovered that an environmental hazard can be averted if regular maintenance is carried out such as cleaning off marine growth, application of anti-corrosion treatments, and monitoring systems were set up for periodic inspection. Preventive measures facilitate prolonging the lifespan of the propeller and performing well for the vessel in varying conditions.
Case Studies: Successful Propeller Changes in 2025
Real-Life Examples of Successful Installations
📈 Case Study 1: Commercial Freighter Upgrade
Challenge:
- Erosion and cavitation damage
- High-salinity ocean conditions
- Declining fuel efficiency
Solution:
- Modern corrosion-resistant alloys
- CAD and CFD design optimization
- Hydrodynamic drag reduction
🎯 Result: 15% improvement in fuel economy with significant cost savings within months
Here is another story from the field: a medium-sized freighter operating in a high-salinity ocean had its outdated propeller replaced. The old propeller had become erosion- and cavitation-damaged because of the prolonged exposure to the bad sea conditions. Choosing materials of modern corrosion-resistant alloys, and knowing precisely how to fit this new symphony of steel and sound waves thanks to CAD and CFD, we restored the vessel’s abilities and, in fact, improved its fuel economy by 15%. So, it did not have to do with the steel alone but with a hydrodynamic design that minimized drag. Fuel costs sustained major savings reported by the client within months into operation, thus making the project a clear success.
🛥️ Case Study 2: Luxury Yacht Noise Reduction
Problem:
- Excessive vibrations and noise
- Compromised passenger comfort
- Increased mechanical strain
Approach:
- Custom propeller design
- Noise-reduction technology
- Precision alignment equipment
🎯 Result: Over 60% reduction in vibrations, significantly improved passenger experience
Another case worth highlighting is the run-in with a luxury yacht propeller. Left alone, the vibrations and noises would have compromised the passenger comforts. Join-the-conversation with engineers, naval architects, and crew members of that particular yacht, to set up a custom design propeller fitted with noise-reduction technology. The entire installation process made use of state-of-the-art alignment equipment to ensure perfect installation and stronger elimination of vibrations in excess of 60%. Passenger feedback after operationalization showed notable improvements in onboard experiences. Yacht operators bared better engine performance and lesser strain on mechanical components as well after installation of these propellers. Both instances give one reason to believe that strategic changes to a propeller and advanced technologies can bring about real enhancements to vessel efficiency and user satisfaction.
Data-Driven Insights on Performance Improvement
Performance improvement from the data perspective starts with the in-depth analysis of key metrics. For example, if we are looking at the assessment for improving performance of marine vessels, information concerning fuel consumption efficiency, vibration reduction, and power development by the engine is very useful. An operator can gather and study real-time data on these parameters and spot areas where efficiency is lacking and focus on corrective measures. In one such situation, a 25% improvement in fuel efficiency was realized following the installation of advanced propellers designed for a very specific operational profile of the vessel. Data, therefore, play an awe-mazing role in both solving problems and in verifying that the solution really works.
📊 Key Performance Metrics
25%
Fuel Efficiency Improvement
60%
Vibration Reduction
15%
Power Optimization
Another example of data-driven optimization is vibration analysis. Using vibration data, operators can observe vibrations patterns under various operating conditions, looking for areas where excessive vibration may cause mechanical wear or passenger discomfort. It gets better from here. Equipped with insight, operators could defiantly attack the problem, such as by replacing the propulsion components or recalibrating the systems for optimal performance. It’s not just hypothetical—the greatest ever recorded drop in level of vibration measurements is more than 60%, granted in one particular application- directly demonstrating that such an intervention can produce great operational gains and improvements in user experience.
Lessons Learned from Propeller Swaps
🎓 Key Takeaways from Professional Experience
- Methodical pre-swap analysis is paramount
- Professional collaboration enhances outcomes
- Post-swap testing validates improvements
Drawing from my experience, one of the paramount lessons learned during propeller swaps is that one must be very methodical and analyze what they plan to do before effecting a modification. Each propeller swap has its own set of variables, including aircraft, operational objectives, and environmental conditions. For the required optimization, performance data should be evaluated prior to the swap in terms of thrust, fuel consumption, and noise. Time is saved, and costly blunders or similar bad outcomes are less likely when making use of sound data as my guiding principle.
Another important lesson is to collaborate with professionals and work with the cutting-edge technology available. It has proven indispensable working with specialized technicians, manufacturers, and aerodynamicists to make sure that every adjustment is a proper one in relation to either the performance aim or regulatory standards. On the other hand, working in close harmony with colleagues will assure that no detail is missed away, from installation procedure to testing after the swap.
At the same time, I have learned that post-swap testing is very important, nearly as important as the initial system analysis and preparation. It is crucial after the swap to conduct rigorous testing to prove that the improvements made will provide actual performance gains, be it in fuel savings, speed, or any other operational characteristics. This working cycle of testing and refinement makes sure that every propeller swap unarguably adds an improvement to the operation and is a vital step within any upgrade path.
Reference Sources
-
How to Change a Boat Propeller in 2025 – Captain Propeller
- A guide exploring updated techniques and tools for propeller installation in 2025.
-
Propeller Tutorials, Maintenance, & Care Videos – Mercury Marine
- Offers video tutorials on correct propeller installation, including using advanced hub kits.
-
The Most Detailed & Comprehensive Guide to Boat Propellers – VIF Marine
- A 2025 guide covering all aspects of boat propellers, including installation and maintenance.
- Find more info now.