The propeller installation for your Yamaha outboard vessel significantly impacts your boat’s ultimate performance, fuel efficiency, and maneuverability. For the seasoned boater or first-time installer, understanding the entire installation procedure is the key to ensuring smooth operation and the longevity of the outboard. This guide will walk you through the actual installation, offer expert tips, and highlight key considerations for the latest 2025 model of Yamaha propellers. By the time you are finished reading, you will feel completely confident and be ready to boost your boating skills and keep your engine in tip-top shape. Whether putting in a new propeller or replacing a worn-out propeller, all of the knowledge you will ever need to complete the job is contained herein.
Understanding Yamaha Outboards and Their Propellers
Yamaha Outboards: General Description
Known for their reliability, efficiency, and cutting-edge technology, Yamaha outboards are the most preferred among boat owners worldwide. These engines are designed for high performance, representing every range of small fishing boats to high-performance watercraft. Yamaha offers an extensive range, starting with portable engines, mid-range models, and then V6 and V8 powerhouse outboards for heavy-duty applications.
Latest Yamaha Innovations
- Digital Control System: Increased precision with reduced operator fatigue
- Shift Dampener System (SDS): Reduces noise and vibration for smooth operation
- Enhanced Fuel Efficiency: Cost-effective operations with high performance levels
- Corrosion-Resistant Properties: Enhanced durability in freshwater and saltwater conditions
With a worldwide reputation for smooth performance and constant innovation, the company continues to meet the demands of boaters with engines that offer power, reliability, and environmental friendliness. Because of this engineering tradition, institution, or family, optimal performance can be expected from every engine-user interaction.
Importance of selecting the right propeller
Choosing a suitable propeller is a crucial factor in determining how well your boat’s engine performs in terms of speed, fuel consumption, handling, and other aspects. If the engine runs within its specific RPM designed for best horsepower and fuel efficiency, it remains efficient. Selecting a propeller with a particular pitch and diameter, depending on the size of the boat and its intended usage, considerably reduces the load on the engine and thereby increases its lifespan. Modern propeller materials and designs offer stainless steel propellers enhanced durability and improved thrust in various water conditions. If you take the time to consider the type of boat, its engine parameters, and the activities you want to engage in, whether it’s cruising, fishing, or watersports, you can be sure of making an informed decision to improve your boating experience.
Types of Yamaha Outboard Propellers
Several types of Yamaha outboard propellers are available to suit the specific conditions and activities associated with boat operation. Performance, operation, and durability are carefully considered for each propeller type. The following are some common types of Yamaha outboard propellers with a few of their most significant features and benefits:
Aluminum Propellers
Aluminum propellers are an ideal choice for all-around use, offering a cost-effective option for the average recreational boater. They are lightweight, reasonably durable, and suitable for low- to mid-horsepower engines. These propellers are coated for corrosion resistance, thus making them highly durable in freshwater environments.
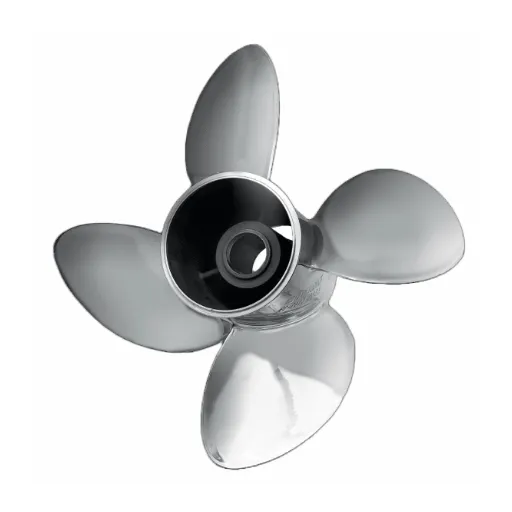
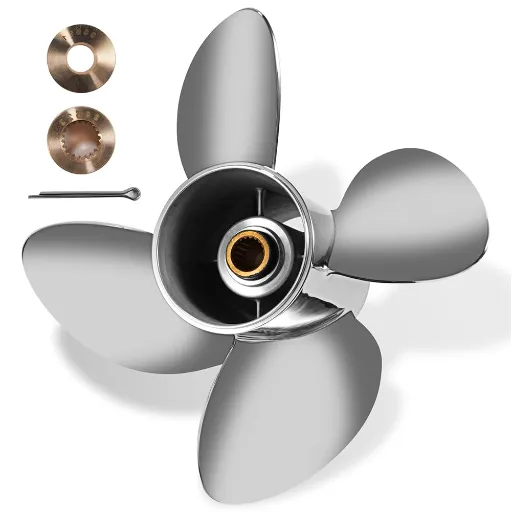
Stainless Steel Propellers
These are synonymous with strength and exceptional performance. They offer the advantages of wear resistance and durability, making them high-performance and application-friendly. They are more resistant to dents than their aluminum counterparts and provide better thrust and fuel efficiency, especially when demanded by oceanic or higher marine speed conditions.
Performance Series Propellers
Yamaha manufactures performance-tuned propellers for competitive or high-speed boating activities. In the design of these propellers, advanced hydrodynamic processes are incorporated, including venting systems and highly polished blades, to maximize acceleration, top speed, and handling.
Pontoon Boat Propellers
These propellers are specifically designed to support the load of pontoon boats. The design of their blade geometry enables them to provide better thrust at lower speeds, allowing for smooth operation and improved maneuverability in heavily loaded pontoon boats.
Saltwater Series Propellers
For coastal and offshore boating, Yamaha Saltwater Series propellers are specifically designed with highly durable materials, corrosion-resistant coatings, and finishes. They are designed to function reliably in the harsh environment of saltwater and are usually paired with larger motors to handle rough waters.
Reliance Series Propellers
A perfect match for medium-sized outboards, Reliance propellers are known for increasing fuel savings and enhancing midrange performance. These are commonly used on boats that require precise handling, such as center consoles or small fishing boats.
Dual Thrust™ Propellers
Offered as a specialized improvement for heavy pushing power at low speeds, Dual Thrust™ propellers work great with heavy loads and trolling applications. Their unique design helps minimize engine exhaust interference, resulting in consistent power and improved control.
Choosing the right Yamaha outboard propeller for your specific type of boat, engine power rating, and intended usage will provide you with optimal performance, improved fuel economy, and long-term satisfaction on the water.
Essential Tools and Hardware for Propeller Installation
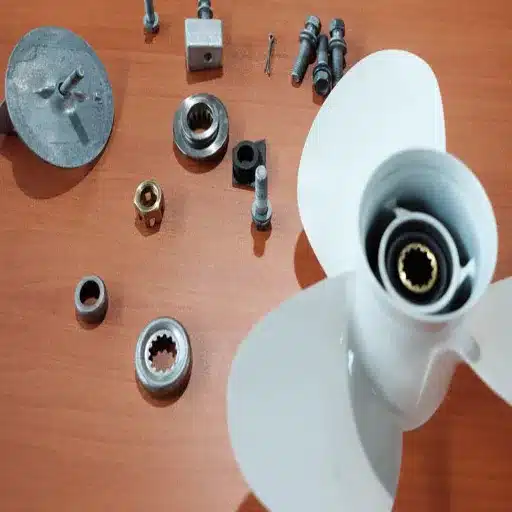
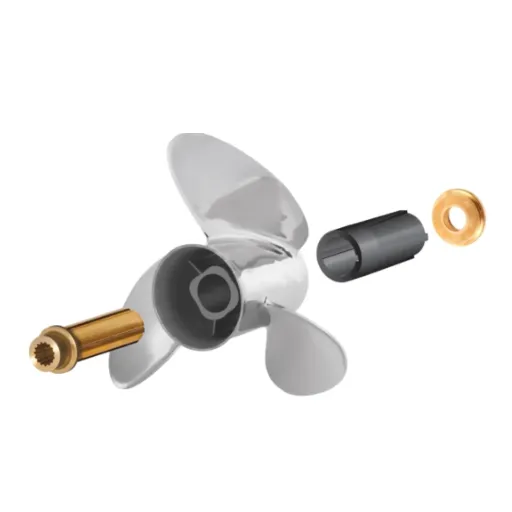
List of Installation Hardware Kits Required
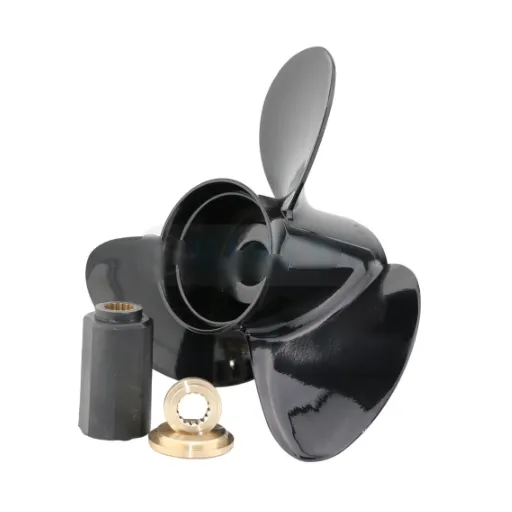
- Propeller Nut Kit: Consists of the propeller nut, washer, and cotter pin. It is to secure the propeller onto the shaft for stable performance.
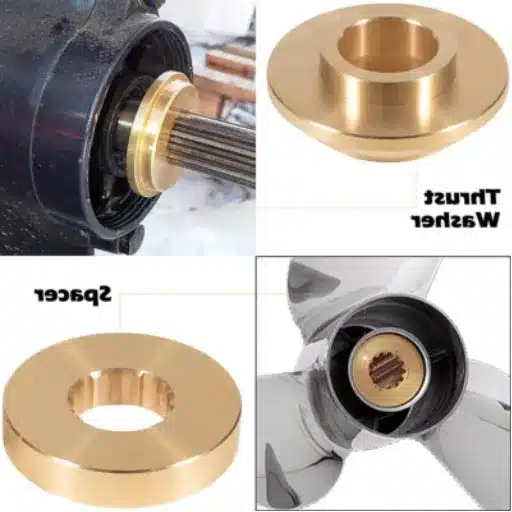
- Thrust Washer: Absorbs axial forces and ensures proper alignment between the propeller and the engine shaft.
- Spacer Ring: Used for providing extra spacing with some propeller designs and keeping unnecessary vibrations from passing through.
- Propeller Hub Kit: Absorbs some impact from the propeller to minimize gearcase damage.
- Tab Washer: Holds the propeller nut in place to prevent it from loosening during its high-speed performance.
- Spline Grease: It makes for easy assembly and disassembly of the propeller parts while preventing corrosion.
Each enumerated item in this list outlines the working installation of your Yamaha outboard propellers against safety and performance measures on the water, ensuring proper operation. Preparing accurately with the correct hardware cuts downtime and offers a pleasurable boating experience.
Recommended Tools for the Installation of the Yamaha Propeller
The right tools are needed for an efficient and smooth Yamaha propeller installation. Below is a list of recommended tools that would aid in smoothing the installation process, whilst helping outboards for a longer life duration:
Each of these tools has its place in ensuring the smooth installation of your Yamaha propeller. Their use will speed up the operation while contributing to safety and minimizing the risk of harm to your outboard motor or the propeller itself. All that attention to detail and proper use of tools is what will keep performance at its peak when out on the water!
Safety Equipment and Precautions
!
Safety First – Essential Precautions
- Personal Protective Equipment: Safety gloves, safety goggles, and slip-resistant shoes
- Work Environment: Well-ventilated and adequately lit area
- Power Disconnect: Ensure outboard motor is disconnected from any power source
- Fire Safety: Keep fire extinguisher nearby for flammable materials
- Stable Surface: Work on firm, solid surface free from clutter
- Tool Inspection: Check all tools for wear or damage before use
Safety comes first whenever moving about, especially when installing a Yamaha propeller, to avoid getting hurt or damaging the equipment. The PPE that must be worn consists of safety gloves, safety goggles, and slip-resistant shoes to protect against various potential hazards, including sharp blades, flying debris, or wet surfaces. Furthermore, the work area should be well-ventilated and adequately lit, thereby reducing the risk of accidental mishandling due to poor visibility.
Disconnect the outboard motor from any power source so that the engine does not accidentally get engaged while handling the propeller. A fire extinguisher must be kept nearby in case of any fires arising from flammable materials. It is advisable to work on a firm, solid surface. If working on a dock, it should be free from clutter and capable of handling the weight of tools and movements without any risk of accident.
Before use, take a moment to inspect all tools and equipment for signs of wear or damage. Malfunctioning tools can cause accidents or lead to improper construction. These safety precautions act to provide for a safe working environment and, at the same time, promote the longevity of your Yamaha propeller.
Step-by-Step Guide to Yamaha Outboard Propeller Installation
Preparing Your Outboard Motor for Installation
An impeccable preparation will allow a smooth and efficient installation of the Yamaha outboard propeller. Therefore, begin by disconnecting the outboard motor from its power source for safety. Then, ensure your boat is securely on a trailer and is level and stable so that it will not move unexpectedly while you are working.
Preparation Checklist
- Clean the propeller shaft and surrounding area from debris
- Apply light marine grease to the shaft
- Inspect propeller splines for wear or damage
- Verify correct propeller model for your motor
- Confirm appropriate pitch and diameter specifications
Clean off the propeller shaft and the surrounding area from any trash or residue that may affect installation or long-term performance. Grease the shaft lightly with marine grease to prevent corrosion and reduce friction over time. Inspect the propeller splines for any wear or damage, as even minor flaws can compromise alignment and performance.
Finally, ensure that the right Yamaha propeller is purchased for your motor model and its intended use, so that an appropriate pitch and diameter are selected to deliver the engine performance, fuel economy, and handling required for your watercraft. By performing these preparatory steps, you will have created a solid foundation upon which the propeller installation can occur without any issues.
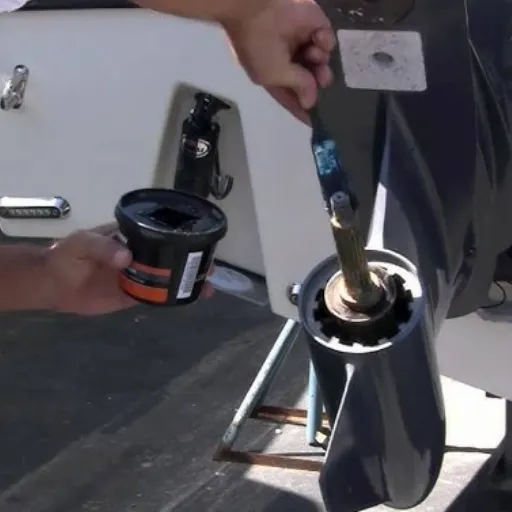
Removing the Old Propeller
Safety First
Ensure the boat engine is off and the key is removed from the ignition, for safety’s sake. Then, place the engine in an upright and steady position for easy access to the propeller for removal.
Remove Propeller Nut
Locating a propeller nut in the middle of the propeller, use the correct size socket wrench to loosen it from the prop shaft and pull the prop off. Note that you will need to retain all parts, such as the washer and cotter pin, as they will be required during the installation of the new propeller.
Slide Off Propeller
Once the nut is off, gently slide the propeller off the shaft. Occasionally, debris, corrosion, or simply a tight fit may make it difficult at times. You can try to apply marine lubricant or give it a few light taps with a rubber mallet to loosen the fit without damaging the propeller.
Inspect and Clean
Ensure to inspect the shaft for fishing line or debris that may have gotten tangled, as this would affect your motor’s performance. This also gives you a chance to inspect the condition of the shaft and seals to ensure they are free from wear and corrosion before fitting the new propeller.
Take good care of all hardware removed and place them safely for reuse while progressing to the next step in installation.
Installing the New Yamaha Outboard Propeller
Prepare the New Propeller
Examine the Yamaha outboard propeller very thoroughly before installation for any defects or damage that may impair its performance. Verify that it is the correct size and pitch for your motor, as these specific specifications determine efficiency and speed in use. Refer to your Yamaha owner’s manual for confirmation on compatibility.
Grease the Propeller Shaft
Grease the propeller shaft with marine-grade grease; this lowers friction and resists corrosion that can develop over time. It ensures that your motor remains in good condition for an extended period and facilitates removal during maintenance.
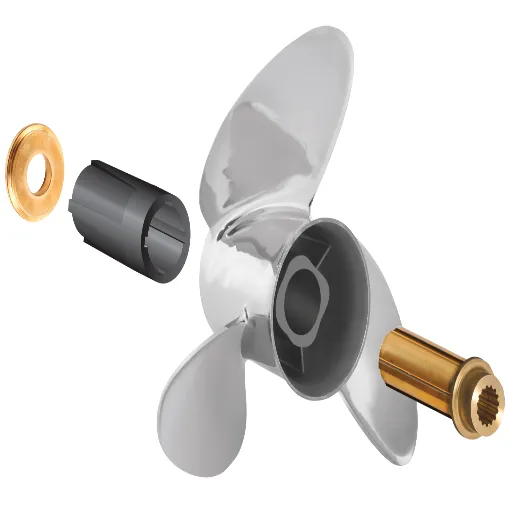
Position the Propeller
Slide the propeller onto the shaft, ensuring it aligns with the keyway. Confirm again that the thrust washer is in place before fitting the propeller, as the washer supports the whole assembly at the points where vibration is absorbed.
Secure the Propeller
Install a spacer and locking hardware, ensuring that everything seats properly. Put on the propeller nut and tighten it to the torque specified in your Yamaha manual, using a torque wrench to apply the exact pressure needed. Over-tightening the propeller could damage it, whereas the reverse situation may cause the propeller to come loose during operation.
Install Locking Mechanism
In the event of securing, use a new cotter pin in a hole of the propeller shaft nut and bend the ends back to lock it. If your motor uses a locking mechanism, ensure it clicks securely.
Final Inspection and Testing
Spin the propeller by hand to check that it moves freely with no resistance or wobbling. Check that all parts are in place, locked, and secure. Once installed, give it a quick test run in the water to test the performance and functionality. Any unusual vibration or noise may indicate potential problems with installation or compatibility.
With diligent application of these steps, your Yamaha outboard motor can be maintained for efficient operation, extended life, and safe and optimal performance.
Tips for Ensuring Peak Performance with Your Yamaha Prop
Adjusting the Propeller to Maximize Performance
Proper adjustment of the propeller is essential for maximizing performance from your Yamaha outboard motor. First, check the recommended RPM range for your particular model so that the motor never works harder than it should. Then, observe whether the propeller at present allows the motor to turn at the stated RPMs under normal operating conditions. If not, then adjustments to the pitch must be made. In general, a low-pitch propeller will increase acceleration and towing power at the expense of maximum speed, while a high-pitch propeller will do the opposite.
Performance Optimization Tips
Material Selection
Aluminum: Lightweight, economical for general use
Stainless Steel: Heavier, more durable for high-speed applications
Pitch Considerations
Low Pitch: Better acceleration and towing power
High Pitch: Higher maximum speed potential
Maintenance
Keep clean and debris-free
Regular assessment and minor modifications
Also, inspect your propeller for the material from which it has been made. Aluminum props are lightweight and economical for general use, while stainless steel is heavier, making it more durable and better suited for high-speed applications. You can consider factors like weight, usage, and water conditions when choosing or trimming a propeller. Keeping it clean and free of debris prevents it from performing poorly. Regular assessment and minor modifications to suit your needs will make the boat more fuel-efficient, easier to handle, and perform better overall, giving you the best experience with your Yamaha motor.
Common Mistakes to Avoid During Installation
✗
Lack of Proper Alignment
Amongst the most common installation errors is the misalignment of the propeller shaft or motor components, which, if improper, can induce premature wear on parts, vibrations, and reduced efficiency. Always ensure that the elements are correctly aligned as per the manufacturer’s specifications.
✗
Incorrect Bolt Tightening
Overtightening or under-tightening of bolts can initiate deterioration of parts or create expansive effects. Observe the torque requirements and use the torque wrench to verify that the bolts have been tightened satisfactorily without overstressing the material.
✗
Avoiding Lubrication
Proper lubrication of the shafts and movable parts during the installation minimizes corrosion and promotes smooth operation. Use marine grease that will protect against moisture, salt deposits, and wear over time.
✗
No Component Inspection
Generally acceptable, the standard procedure is to mount the propeller without a thorough examination to detect any damage, such as nicks, dings, or blade bending. Continuously assess all components for signs of wear, as premature failure will occur otherwise.
✗
Ignoring Manufacturer’s Guidelines
They specify the tools, methods, and safety factors to be applied during installation. If you don’t follow the guidelines or use an improper tooling set, you’ll get far less-than-optimal performance, or even worse, the warranty will be voided.
✗
Wrong Blade Pitch Selection
Wrong blade pitch selection is a hindrance to the speed, fuel economy, and performance of a motor. Check all factors involved in the intended use and consult Yamaha’s pitch size recommendations, which consider your boat’s weight and application.
Testing is essential to guarantee that everything functions properly after installation. A water trial serves as an essential evaluation step to confirm if the propeller works satisfactorily, observe if vibrations occur, and ascertain that the performance is optimal in its intended conditions.
Your investment in avoiding these common mistakes will undoubtedly pay off in extending the life of your propeller and keeping your Yamaha motor running at its best for many years.
Routine Maintenance to Make It Last
Performing regular maintenance and upkeep on the Yamaha motor and propeller ensures reliability and optimum performance over time. The initial set of evaluations would involve a visual inspection to check for damage and wear, including cracks, corrosion, and chipping of the propeller blades. Clean the propeller and keep it free from accumulated matter to prevent imbalance, which can also cause unnecessary pressure on the motor. Additionally, periodically check the propeller nut to ensure it is tightened according to the manufacturer’s specifications. A loose propeller could end in severe engine damage or loss during operation.
Essential Maintenance Schedule
- Visual Inspection: Check for cracks, corrosion, and blade chipping
- Cleaning: Remove accumulated debris to prevent imbalance
- Propeller Nut Check: Verify tightening to manufacturer specifications
- Shaft Lubrication: Apply marine-grade grease regularly
- Cotter Pin Inspection: Check for wear and replace as necessary
- Hardware Replacement: Replace damaged components promptly
On the other hand, a key maintenance procedure is lubricating the propeller shaft, which prevents the shaft from seizing and facilitates the easy removal of the propeller in the future. Always make it a habit to remove the propeller shaft and apply marine-grade grease liberally for smooth operation. Check the cotter pin or its equivalent fastening device for wear at regular intervals and replace it as necessary to avoid any interruption to operations.
Lastly, staying proactive in maintenance intervals, such as promptly replacing damaged hardware, is another aspect to consider for smoother operation. Incorporating these maintenance procedures will maintain the Yamaha motor’s performance and avoid high repair costs.
Case Studies and Trends for 2025 in Outboard Propeller Technology
Introduction of New Yamaha Propeller Designs
Yamaha propellers have long been the benchmark of excellence in the industry. The designs developed embody the balance between durability, efficiency, and new performance upgrades. Recent introductions have brought high-tech materials, such as stainless steel alloys and composite blends, to the forefront of propeller applications, ensuring both durability and lightweight construction. These materials offer maximum corrosion resistance and add extra layers of fuel efficiency and smooth boat-handling characteristics.
2025 Design Innovations
Another critical factor that has come into play is blade cupping. This improves the blade’s grip in water during acceleration and tight turns, providing the operator with better control and stability in harsher conditions. Yamaha has also worked on enhancing cavitation-reduction techniques that not only improve the level of noise control produced but also reduce performance interference due to the formation of air bubbles around the propeller.
Data show that an enhanced propeller design can result in a 10% increase in fuel efficiency in mid-range outboards, highlighting its significant impact on both cost savings and environmental performance. Being focused on modularity, Yamaha’s propellers include interchangeable components, allowing a boat owner to tailor their setup to personal performance preferences, such as fishing, cruising, or high-speed cruising.
With these latest technologies, its propeller technologies would be able to satisfy the changing marine environment, providing the commercial and recreational boating industry with reliable performance.
Outboard Motor Efficiency and Performance Data
Outboard motor efficiency and performance must be the highest, considering all other factors, to achieve fuel economy and reliability, with speed and handling as secondary concerns. Modern outboard motors now feature state-of-the-art engineering innovations, fine-tuning the combustion process with the use of EFI (Electronic Fuel Injection) systems, which measure the air-fuel ratio to minimize waste. As a result, fuel efficiency can be increased by approximately 30% compared to traditional carbureted engines.
Tests in high-performance categories suggest that lightweight materials, such as aluminum technology and composite alloys, offer better power-to-weight ratios, which benefits acceleration and handling. These new motors also prioritize noise and vibration reduction with integrated damping systems inside the body, making them quieter to operate and thereby enhancing the overall boating experience.
Moreover, DFIs have emerged as the actual game changer in emission control with negligible compromises on power. DFI-equipped engines produce about 75% fewer pollutants than conventional engines, in harmony with the proliferation of environmental laws in various regions, creating a win-win situation upon concurrent adoption.
Finally, inventiveness in propeller mechanisms optimizes tradeoffs between thrust and fuel consumption regarding blade design and CFD. Research indicates that such propellers can boost cruise efficiency by 10%, allowing boaters to travel further with less fuel consumption. These innovations showcase a relentless pursuit to develop user satisfaction alongside environmentally friendly marine technologies.
User Experiences and Testimonials
“A few days ago, I installed a new propeller system upgrade based on CFD design. What a difference it has made! Apart from cruising more smoothly, the boat has noticeably consumed less fuel. The last time I traveled, I achieved 15% more mileage for the same amount of fuel with the new propeller compared to the earlier one. It’s reassuring that these higher technologies not only enhance performance but also help keep the boat green by reducing emissions.”
“Another boater I met at the marina shared his experience of switching to an advanced blade design propeller system. He said the upgrade was so smooth that his engine practically felt brand new. They really appreciated the quieter operation, which increased their enjoyment while on the water. In the eyes of this person, investing in cutting-edge marine technology was not only an investment in cost efficiency but also a means to enhance the pleasure and sustainability of a boating experience.”
From my own story and others’ experiences shared with the broader boating community, I can say it’s clear to all that innovations in propeller dynamics are making a significant difference. Whether it is improved handling, enhanced efficiency, or reducing environmental impact, such solutions are sought by those who desire a contemporary approach to marine travel. Anyone who cares about the water will appreciate these ongoing efforts to make boating more efficient and enjoyable.
Reference Sources
-
How to Replace a Yamaha Outboard Propeller – A step-by-step guide to safely and effectively change the propeller on Yamaha outboard motors.
-
Master the Art of Yamaha Outboard Propeller Installation – Covers essential components like the kit, hardware, nut, spacer, thrust washer, and pin for proper installation.
-
How To Install A Prop – A video guide from Yamaha Outboards demonstrating easy steps for propeller installation.
Frequently Asked Questions (FAQs)
Master Your Yamaha Propeller Installation
With this comprehensive guide, you now have all the knowledge and techniques needed to successfully install, maintain, and optimize your Yamaha outboard propeller. Remember that proper installation and regular maintenance are key to achieving peak performance, fuel efficiency, and longevity from your marine investment. Safe boating and smooth sailing!