The Mercury propeller’s history is one of innovation and impressive engineering, marking a path of continuous evolution for decades. By 2025, it reached extraordinary heights, with advances shifting the paradigm toward improvements in performance, efficiency, and durability on water. We will explore the defining changes that have shaped contemporary propeller technology and examine how Mercury has not only kept up with boaters’ needs but has, in fact, set new performance standards within the industry. From state-of-the-art materials to better hydrodynamics, we will guide you through the landmarks that have been pivotal in driving memorable boating experiences. Whether you are looking for an exposé from a marine lover or just from a laywoman’s standpoint, this deep dive into Mercury’s achievements will have you wondering what the future holds for outboard motor innovations.
Introduction to Mercury Outboard Propellers
Some Basic Stuff About Mercury Outboard Motors
Always identified with reliability, efficiency, and technical innovation in marine propulsion systems, Mercury outboard motors were constructed to respond to all kinds of boating needs so that you can have anything from light portable motors to high-powered ones for larger vessels. Mercury engines feature the latest technologies, such as Digital Throttle and Shift (DTS) for smooth, exact control, and Adaptive Speed Control for even performance under varying loads.
Performance Highlight: Now, performance-wise, the V12 Verado Mercury outboard motor is an absolute revolution. The steerable gearcase is an industry first, complemented by dual contra-rotating propellers for optimum thrust and maneuverability. Fuel efficiency and low emissions are equally important, enhancing its environmental sustainability with the highest power output.
Mercury’s emphasis on user technology implies SmartCraft, an integrated digital system that provides real-time engine diagnostics, navigation data, and fuel usage statistics to ensure a seamless boating experience. Mercury outboard motors perfectly combine ruggedness, innovation, and environmentally conscious engineering to meet modern boaters’ demands, setting a new benchmark for the industry.
The Importance of Propellers in Outboard Performance
The outboard propeller stands foremost as the device that significantly impacts the overall performance and efficiency of the outboard engine. Serving as the intermediary in the transmission of engine power into water propulsion, this ultimately affects the speed, acceleration, fuel consumption, and handling. Different propeller designs transmute power from the engine into forward motion with varying efficacies: thus, the materials used, the number of blades, pitch, and diameter determine how power is transmitted for motion. Propellers with higher pitch rates would, therefore, allow higher top-end speeds, while those with lower pitch rates would provide better acceleration and load handling. Likewise, materials for higher-grade propellers, such as stainless steel, would enhance performance by offering strength and reduced drag, ensuring consistency even under demanding conditions. Therefore, selecting the right propeller is crucial for an outboard motor to perform at its best, with performance tailored to the client’s specialized requirements for activities such as towing, cruising, or fishing.
Market Trends in Outboard Propellers
The market for the outboard propeller changes as the marine technology advances and buyers’ demands change. Major trends include the quest for fuel-efficient designs, as manufacturers innovate in response to environmental concerns and rising fuel prices. Propellers with optimized blade geometry and lightweight materials are in higher demand because they consume less energy and enhance the efficiency of the boat.
🔍 Key Market Trends
- Intelligence Features: Introduction of sensors and connectivity for real-time performance monitoring
- Custom Solutions: Increasing demand for propellers tailored to specific uses
- Material Innovation: Stainless steel propellers for durability and corrosion resistance
- Environmental Focus: Propellers that reduce underwater noise and marine ecosystem impact
Another big trend is the introduction of intelligence features within the propeller systems. The current designs can incorporate sensors and enable connectivity, allowing the owners of shore vessels to monitor specific performance parameters in real time. These advanced systems could provide valuable information about speed, drag, and fuel efficiency, thereby enhancing users’ ability to optimize maintenance regimes and performance further.
Also, there has been an increasing demand for custom-made solutions on the market. Boaters are seeking propellers that specifically cater to their uses for high-speed recreational boating, steady-speed trolling, or towing. Hence, manufacturers have been expanding their product portfolios to include a wide variety of sizes and pitches, as well as offering various material options to suit different needs.
Besides, stainless steel propellers are widely considered more durable and corrosion-resistant than other alternatives, especially in saltwater applications. The increasing production of these materials for high-performance applications is a testament to the market’s emphasis on long-term viability and maintenance.
In the end, the overall need for more environmentally friendly propellers that abate underwater noise and lessen the impact on marine ecosystems is being augmented. Therefore, the whole market gets pushed towards green innovation due to sustainability issues and regulations.
Historical Milestones in Mercury Propeller Development
Earlier Innovations in Mercury Propellers
The development of Mercury propellers is shown to extend into the middle of the 20th century, when improvements in the uplift and performance of marine propulsion machinery were being sought. One of the earlier breakthroughs was the use of aluminum in propellers, which gave the boaters an economically viable, lightweight alternative to traditional steel designs. Due to its increased handling and adequate fuel economy at a low price, it quickly gained consideration.
1960s Innovation
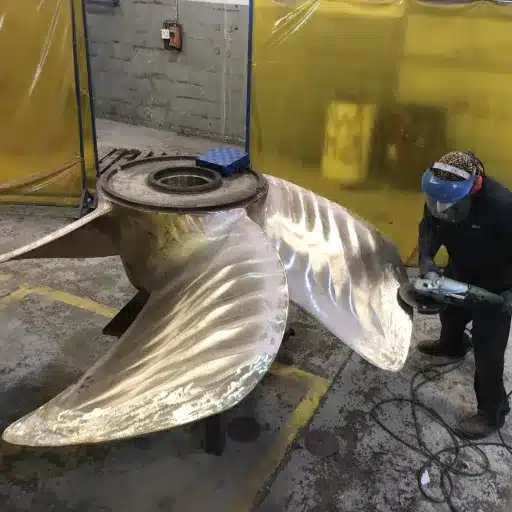
Emergence of stainless steel propellers, cherished for rugged build and corrosion resistance, setting new benchmarks for reliability in both freshwater and saltwater.
Late 20th Century
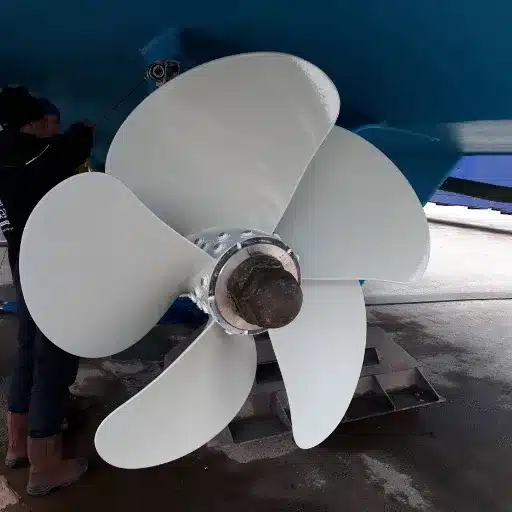
Introduction of four-bladed propellers to enhance stability and mid-range performance for larger crafts and applications needing better load-carrying capability.
In and around the 1960s, Mercury would evolve yet again with the emergence of stainless steel propellers. These were highly cherished for their rugged build and resistance to corrosion, setting a new benchmark for ultimate reliability in both freshwater and saltwater. Stainless steel solutions with higher tensile strength also allowed for more complex blade designs that boasted acceleration and top speed, resulting in better performance for both commercial and recreational boaters.
Near the latter part of the 20th century, Mercury introduced four-bladed propellers during key evolutionary phases in its timeline. These propellers were meant to enhance stability and mid-range performance for larger crafts and applications needing better load-carrying capability. That gave Mercury a global reach to a broader spectrum of boating enthusiasts.
From these fundamental inventions, Mercury propellers have paved the way for today’s high-performance and environmentally considerate designs, embodying the age-old tradition of precision engineering and customer-oriented solutions.
Aluminum Introduction and Changes Brought
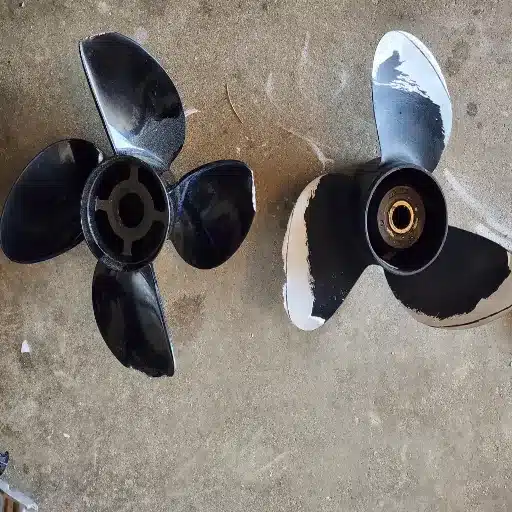
Presenting aluminum paved the way for the evolution of propeller manufacture, as lightweight efficiency and corrosion resistance were significant factors that tipped the scales. Aluminum, being of low density and high strength, propels well and quickly without adding weight to a boat, making it suitable for almost all watercraft. The aluminum itself contains corrosion-resisting properties, thus ensuring longevity even in saltwater environments, which is always essential for durability. This right here gave the boaters a cheaper alternative to materials such as bronze without considerably compromising on functionality or reliability.
✓ Advantages of Aluminum Propellers
- Low density and high strength for efficient propulsion
- Corrosion-resistant properties for saltwater durability
- Cost-effective alternative to bronze materials
- Enhanced production efficiency reducing manufacturing costs
A further positive factor affecting production efficiency and product cost is the widespread use of aluminum in manufacturing. Thus, the availability of high-quality propellers for recreational and commercial settings enlarges the maritime market. In contemporary times, aided by modern design and casting techniques, aluminum propellers are offering the market futuristic features like improved hydrodynamic efficiency and fuel economy, thus responding to the hopes for sustainable and high-performance solutions. The introduction of aluminum into the propeller manufacturing process marked a bold landmark, where precision engineering co-exists with the needs of the common man from various walks of life.
Milestones Leading to Modern Mercury Propellers
Significant technological breakthroughs and landmark achievements will illuminate the evolution of modern Mercury propellers, which will re-establish marine propulsion. Mercury led with monumental engineering feats in stainless steel propellers during the mid-20th century, offering excellent durability and performance compared to propellers made of traditional materials. These advances set the framework for the precision engineering present today.
Things got accelerated with the advent of CAD/Aided Design and CFD/Computational Fluid Dynamics technology, which allowed for the simulation of water flow, along with the optimization of propeller blade perspective for efficiency and thrust. These integrated tools allowed Mercury to achieve a breakthrough with actual drag reduction and better hydrodynamic performance.
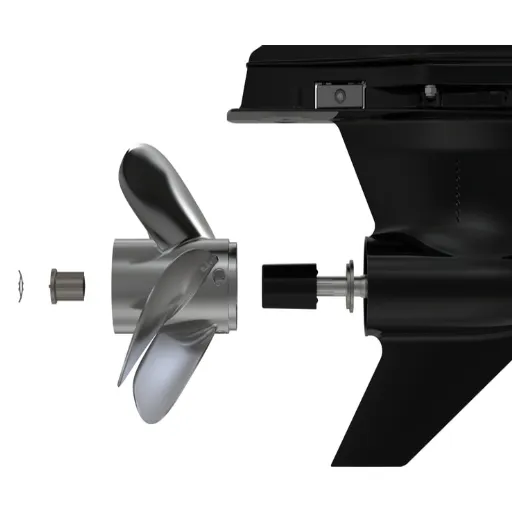
Interchangeable hub systems became, perhaps, a significant milestone `cause they are compatible with essentially all sorts of boat engines. This allowed users the flexibility to opt for inexpensive solutions and facilitated easier installation. In addition, the use of advanced finishes and coatings on propellers has also improved corrosion resistance, particularly against aggressive marine environments.
As time passed, Mercury leaned toward sustainability, with green innovations emphasizing fuel savings and low emissions through propeller geometry optimization. These endeavors address the growing demand for environmentally friendly boating solutions, which is essential to consider while maintaining the high standards of performance that Mercury consistently upholds.
Hence, the modern Mercury propeller is essentially a culmination of decades of research, application of new technology, and evolution to meet the needs and wants of the recreational and professional boaters in tandem. Each milestone marks a commitment to excellence, taking us another step toward superior propulsion systems.
Popular Mercury Propeller Models and Their Features
Fury Propeller: Performance and Efficiency
🚀 Fury Propeller Highlights
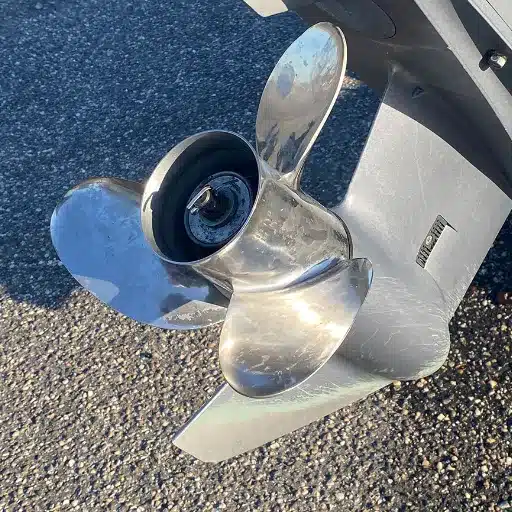
Fury Propeller stands apart for those boat owners who want the utmost performance in speed and fuel economy. It is designed with fine precision and made from stainless steel, which guarantees strength and long life in maritime conditions. Advanced blade geometry is a feature that reduces slip and improves acceleration. This allows Fury to propel boats to very high speeds while maintaining maximum fuel economy.
Cavitation is reduced because the Fury has a unique design that minimizes its presence, allowing the set to run smoothly through various water conditions. The propeller offers excellent bow lift and stability, which significantly aids competitive anglers and high-performance speedsters in achieving faster plane times and ultimately provides an unusual experience when going under their propellers. Fury Propeller offers a wide range of pitch sizes to provide versatility for different boat configurations and engine specifications, aiming for precise handling and unrelenting performance on the water.
The Enertia Series: Design and Why It Matters
Enertia Series propellers are designed for innovation with superior engineering, catering to buyers who demand speed and efficiency. The propellers are created with an advanced alloy process, incorporating materials that are strong and lightweight for maximum durability while minimizing weight. The special attribute promoted by the Enertia Series is acceleration and fuel economy. In this regard, they often appeal to recreational and performance-powered boats.
The blade geometry of the propeller has been designed for optimal water grip, which translates into excellent handling ability at both high and low speeds. The finely tuned design manifests in highly responsive manoeuvrability, even in challenging environments. The Enertia Series is a versatile, pitch-varied range designed for powerboat installations, eliminating cavitation and ensuring smooth riding. At its core, it is equally efficient and comfortable on every boating trip.
Quicksilver and the Evolution of Outboard Propellers
Quicksilver has been instrumental in pushing the growth of outboard propellers by consistently featuring the latest technology and innovations in their designs. They are focused on evolving propellers to improve performance, durability, and fuel efficiency, meeting the ever-changing needs of present-day boaters. To that extent, materials with the highest performance rating, such as stainless steel alloy, have become a standard feature in Quicksilver propellers. They offer the best resistance to corrosion and have a maximum lifetime under given conditions of service in a marine environment.
⚙️ Quicksilver Innovations
- Optimized blade geometry for increased thrust and reduced drag
- Enhanced edge designs and blade cupping to reduce cavitation and vibration
- Patented modular hub systems for easy installation and compatibility
- Performance-driven design with user-focused solutions
One innovation is using the blade geometry to optimize thrust while reducing drag. Hence, this variable provides for increased acceleration, better handling, and diminished fuel consumption, which are crucial considerations for recreational and commercial users alike. Other features have been incorporated into Quicksilver to reduce cavitation and vibration, such as improved edge designs and superior blade cupping, resulting in a smoother and quieter ride.
To further cater to users, Quicksilver patented modular hub systems designed for easy installation and compatibility with many engine brands. The modular design reduces maintenance costs and complexity, providing a responsive and profitable way to upgrade, repair, and ensure the long-term flexibility of a boat. By combining a performance-driven design with user-focused solutions, Quicksilver defines outboard propeller technology and elevates the boating experience for both hobbyists and experts alike.
2025 Trends in Mercury Outboard Propellers
Sustainable Innovations: The Enertia Eco
🌿 Enertia Eco: Leading Sustainable Marine Technology
The Enertia Eco propeller is at the forefront of sustainable technologies in the marine field. Designed to reduce fuel consumption and carbon emissions, the product is made using eco-responsible materials without compromising performance. Designed with an advanced hydrodynamic profile to ensure minimal drag and provide maximum thrust for efficient engine operation, the Enertia Eco has been shown in preliminary trials to enhance fuel efficiency by up to 10% under normal conditions, benefiting the environment and helping boaters save on expenses.
The propeller is also compatible with Mercury’s latest SmartCraft integrated system, which further monitors performance and enhances fuel efficiency. With such sustainable innovation, the Enertia Eco must set a standard amongst environmentally conscious boaters and professionals.
The Rise of the Smart Propeller Technology
Smart propeller technology is disrupting the boating industry, combining engineering and digital intelligence to offer perfect performance and precision. Such systems include real-time performance monitoring, alerting crews for predictive maintenance, and making adaptive adjustments for varying propulsion conditions. For example, propellers integrated with onboard innovative systems automatically adjust pitch or trim based on load, speed, and water conditions, aiming to maximize fuel efficiency while minimizing mechanical fatigue.
| Feature | Benefit | Performance Impact |
|---|---|---|
| Real-time Monitoring | Continuous performance tracking | Optimized efficiency |
| Predictive Maintenance | Early detection of wear/damage | Reduced downtime |
| Adaptive Adjustments | Auto-adjust to conditions | Up to 15% fuel savings |
| Digital Intelligence | Smart performance optimization | Minimized mechanical fatigue |
Data collected shows measurable efficiency improvements in vessels equipped with innovative propulsion systems. Reports indicate that under normal circumstances, fuel could potentially be saved by up to 15%. Furthermore, these safety technologies provide diagnostic information that permits early recognition of wear or damage to critical parts, invaluable to long boating trips or commercial operations where reliability is key.
By exploiting the synergy between sustainability and digital innovation, smart propellers, hence, offer maximum performance while aiming to make boating green. Such a level of innovation indeed positions smart propellers as a much-needed upgrade in the waterborne industry, meeting the growing demand for efficiency and sustainability. These technologies are ever-evolving thanks to engineers and manufacturers who aim to bring them into the marketplace, persistently seeking easy accessibility for boating careers, present, recreational, and professional.
Customization and Matching Propeller to an Outboard Motor
A propeller that matches an outboard motor allows for maximum performance, fuel efficiency, and durability. Density, i.e., diameter and pitch, can directly affect thrust and propulsion. Hence, an incorrect pitch allows the propeller to either over-rev the engine or under-speed it, thereby rendering the entire concept of speed and efficiency almost irrelevant. Finally, the engine manufacturer’s specifications will indeed provide the right propeller size, but further customization may allow for better performance according to the boat’s requirements.
🎯 Customization Factors
- Materials: Aluminum for casual boating (light & affordable) vs. Stainless steel for high-grade applications (durable)
- Blade Design: 3-blade for higher top speed, 4-5 blade for quieter operation and better low-speed control
- Advanced Options: Interchangeable blades and variable pitch systems for adaptive performance
- Testing: Configuration testing for fine-tuning based on vessel characteristics and intended use
The materials also very much enter the scene of customization. Aluminum ones, such as propellers, are light and cheap, making them suitable for casual boating. Stainless steel, being ordinarily more durable, is best for high-grade applications. Varieties of blade designs can also influence acceleration, top speed, and handling. For instance, three-blade propellers produce a higher top speed, whereas four- and five-blade propellers produce a quieter operation and better control at lower speeds.
With advancements in propeller technology, many more customization options are now available, such as interchangeable blades and variable pitch systems, allowing the operator to adjust to changing conditions or specific applications. Other configurations can also be tested to fine-tune performance based on a given set of unique vessel characteristics, weight distribution, or intended use. Considering these variables and taking advantage of modern advances enables the boater to arrive at the ideal power, efficiency, and handling relationship for his outboard motor.
Case Studies: Successful Applications of Mercury Propellers
Powertech Performance Enhancements
Powertech propellers are appropriately touted for enhancing efficiency and handling. Powertech offers virtually any design: different propellers satisfy somewhat different needs-high speed application, towing, or fuel economy. Stainless steel construction ensures both durability and precision, thus providing performance for longer, even in adverse marine environments.
💡 Powertech Fine-Tuning Capabilities
One of the finer adjustments I appreciate with Powertech is the capability to fine-tune the boating experience. With cupping, rake angles, and pitch adjustments, these propellers can be set to match the needs of your vessel and engine precisely. For example, a greater pitch will give you more top-end speed, while design changes will provide you with better holeshot and control. So I can be flexible depending on water conditions, weights, or performance preferences-I have different set-ups for cruising, fishing, or water skiing.
Moreover, Powertech propellers fit perfectly with Mercury outboard motors, reflecting an advanced level of engineering on the engine side. This ensures that maximum power is transferred, slippage is minimized, speed is enhanced, and efficiency is optimized. By choosing the right Powertech model and working with a knowledgeable dealer or technician, I’ve found that it provides for smooth handling, less vibration, and better gas mileage, making it a worthwhile investment for optimizing the overall boating experience.
Solas Innovations in Outboard Propellers
My interactions with Solas outboard propellers have led me to acknowledge that the company truly strives for innovation and precision in design. The company employs advanced materials and technology to manufacture a variety of propellers suitable for different boats, ranging from recreational use to high-performance applications. One of the most notable methods used by Solas is squeeze casting, which guarantees that the propellers are both durable and lightweight. This method offers propellers with a much tighter grain structure and more strength, hence better performance and service life, even under the harshest marine conditions. Moreover, their stainless-steel models exhibit outstanding corrosion resistance, making them perfect for use in saltwater.
Hydrodynamics also come to the fore when the Solas brand is considered. With their finely crafted geometry, the propellers provide superior water flow and minimize cavitation, allowing operations to be carried out smoothly and efficiently. After fitting Solas propellers, I could genuinely feel more power during acceleration and also noticed the craft handling better and being more responsive during high-speed maneuvers. On offer are cutting-edge designs like the Solas HR Titan, which deliver powerful thrust and stability, winning the hearts of boaters who demand performance-oriented and fuel-efficient craft.
⭐ Solas Standout Features
Another aspect of Solas that stands out is its commitment to providing propellers tailored to match various engine specifications. The post-buy testing and adjustments done with a Solas dealer have provided me with a wonderful experience. They helped me select the best propeller through their compatibility chart and professional advice. Performance-wise, this uniquely tailored approach can never be compromised for any engine or application. Thus, the combination of precision manufacturing, advanced design, and customer application adaptability ensures that Solas propellers are always ready to deliver power and efficiency to a boat.
Dealer Insights: Customer Preferences and Trends
Having experienced and seen it again recently, the customer usually gives significant priority to speed and durability. They explore all the possibilities that can ensure engine efficiency and long-term reliability. These days, there is a preference for stainless steel propellers because they are strong and can withstand harsh conditions, especially among frequent boaters or those accustomed to saltwater locations. Customers have become more knowledgeable and are often checking or reading third-party reviews or test information along with the manufacturer’s specifications. The trend strongly supports an informed purchase decision, with people looking to buy something that blends value with quality.
Another significant trend involves the shift toward customization and personalization. Many customers now tend to receive recommendations based on the nature of their boating activities, such as fishing, watersports, or cruising. Hence, tools like the Solas compatibility chart and expert consultations have become very helpful for attending to unique needs. The chart eases decision-making by clarifying how various prop designs and sizes affect performance measurements, specifically speed, fuel consumption, and handling.
Finally, preferences are being shaped by the environment. I have noticed the market’s shift toward “eco-friendly” options as awareness of sustainability increases. Customers are increasingly being asked about energy efficiencies, lower emissions, and the sourcing of materials. With shifting preferences in place, this is the best moment for dealerships to really jump on providing excellent, innovative products while building customer loyalty around keeping pace with these central trends.
Reference Sources
The Evolution of the Mercury Propeller Hub – Mercury Marine
Mercury Racing’s New Altitude Propeller Lines – TNT Custom Marine
Key Features and Benefits for Boaters in 2025 – Captain Marine
Frequently Asked Questions (FAQs)
❓ What is the best Mercury outboard prop for speed?
The best Mercury outboard prop for speed depends mainly on the specific type of operation you are performing, as well as the engine you have. Many find stainless steel props, such as the Bravo series, to achieve better speed and handling. Hence, seeking advice from a dealer on proper pitch and blade design will surely enhance performance. Among favorable choices are Bravo One for sterndrives and Fury for outboards, both highly rated for their efficiency and speed. Trying out several different props will enable you to find the one best suited for your boat.
❓ What are the benefits of having aluminum outboard propellers?
Aluminum outboard propellers come with various advantages, especially in the domain of recreational boating. They typically cost less than their stainless steel counterparts and are thus sought after by recreational users. Aluminum props are lighter, and thus they may provide marginally better mileage and performance at slower speeds. If performance is the utmost concern, then the stainless steel variants from Enertia or PowerTech manufacturers may be better suited. Finally, because aluminum is considered, one must evaluate engine specifications and operational goals to choose the right prop accurately.
❓ How do I choose the right pitch for my Mercury propeller?
Selecting the right pitch for your Mercury propeller will, however, give the best performance possible. The pitch is the distance a propeller would move in one complete revolution if placed in a solid medium, and it, thus, varies the speed and rpm of an engine. Low-pitch propeller encourages acceleration, which is suitable for water sports, while high-pitch propellers favor speed. Another good way to determine the right pitch is to ask a technician or dealer who can inspect your boat’s setup and recommend a pitch suitable for your engine power and intended use. By trialing different pitches, you can attain the ideal performance for your boating experience.
❓ Is there any difference between 4-blade propellers and 3-blade propellers?
The primary difference between 4-blade and 3-blade outboard propellers is their design considerations and performance. The four-blade props, such as those on the Spitfire, offer better grip and handling, thus promoting greater stability and responsiveness in heavy chop. Whereas the three-blade props are usually more efficient at higher speeds, they are generally used for performance applications. Your preference varies with your boating needs, whether speed or handling. But it is always good to check with an expert, so they will help you make a more informed choice on what is best for your setup.
❓ Would the Mercury outboard propellers fit other brands?
While Mercury outboard propellers are designed exclusively for Mercury engines, many props can be fit for another brand, depending upon their specifications. It is essential to make sure that a selected prop fits the shaft size and spline count of your engine. Some models, such as Michigan and Quicksilver props, are marketed to be more mutually compatible with other outboards- but this is generally not advisable for maximum performance and safety*. An excellent place to seek advice would be from a dealer, who could aid you in finding the best props for your outboard motor.
❓ What kind of maintenance is needed for Mercury outboard propellers?
Your Mercury outboard propeller needs minor maintenance for longevity and performance. Astute evaluation of dents and nicks must be done on it. Such dents and nicks may affect both performance and fuel consumption. The propeller should be cleaned as part of after-use maintenance to avoid corrosion, mainly when operating in saltwater environments. Check for any fishing line or debris that might become entangled whenever inspecting. If you feel that your propeller has sustained considerable wear and tear or impaired its performance, consulting a technician for repair or replacement is the best option to keep your boat gliding smoothly.